Razor PagesでAjaxでPostする
Razor Pagesではページハンドラー(MVCでのアクションメソッド)をAjaxから直接呼び出せるため、別途MVCのWebAPIとして作成する必要はなく、ページモデル(cshtml.cs)内に書くことができる。
以下の例ではJSONデータを返すだけのシンプルなものだが、画像を返すのであればおそらくFileStreamResultを返せばよい。
ページモデル側で以下のようにプロパティとOnPostMyActionページハンドラーを用意する。
        [BindProperty]
        public MyClass MyClassData { get; set; }

        [BindProperty]
        public string MyString { get; set; }

        public IActionResult OnPostMyAction()
        {
            return new JsonResult(new { Result =  this.MyClassData});
        }
cshtml側で送信ボタンと、PostするAjaxを用意する
@Html.AntiForgeryToken()
<button onclick="postData()">送信</button>

@section Scripts{
    <script>
        function postData() {
            $.ajax({
                type: "POST",
                beforeSend: function (xhr) {
                    xhr.setRequestHeader("XSRF-TOKEN",
                        $('input:hidden[name="__RequestVerificationToken"]').val());
                },
                url: "?handler=MyAction",
                data: {
                    myClassData: {
                        Name:"hello"
                    },
                    myString:"hello2"
                },
                success: function (data) {
                    console.log(data)
                    calendar.refetchEvents();
                    onCloseModal();
                }
            });
        }
    </script>
}
ボタンを押すとpostData()関数が実行され、myClassDataとmyStringにデータがセットされてPostされる。
ASP.NET CoreではXSRF対策がデフォルトで有効になるため、リクエストにはXSRFトークンをヘッダーにセットしておく必要がある。 そのため、XSRFトークンを保持するhidden inputを埋め込んでおく必要がある。
@Html.AntiForgeryToken()
この値を以下の部分でヘッダーにセットしている。
                beforeSend: function (xhr) {
                    xhr.setRequestHeader("XSRF-TOKEN",
                        $('input:hidden[name="__RequestVerificationToken"]').val());
                },
XSRFトークンのキー名(ここでは”XSRF-TOKEN”)を設定しておく必要があり、これをprogram.csで以下のように指定しておく。
builder.Services.AddAntiforgery(options =>
{
    options.HeaderName = "XSRF-TOKEN";
});
POST先は以下のように?handler={ページハンドラ名}とする。ここでいうページハンドラ名とはページモデルで定義したページハンドラーからOnPost を削除(もしAsyncが末尾についていればそれも除く)した文字列である。例えばOnPostMyActionAsync というページハンドラの場合、MyAction がAjaxで宛先の指定に使われるページハンドラ名である。
url: "?handler=MyAction"
Ajaxで送信するデータは、プロパティ名を指定して以下のようにする。
                data: {
                    myClassData: {
                        Name:"hello"
                    },
                    myString:"hello2"
                },
これでページモデル側の対応するプロパティに値が入る。

おまけ
Postするデータを構成するときに、プロパティ名をハードコーディングしたくない気がする。
その場合は以下のようにnameofでプロパティ名を指定することもできる。が、可読性が下がる気がする。
        function postData() {
            $.ajax({
                type: "POST",
                beforeSend: function (xhr) {
                    xhr.setRequestHeader("XSRF-TOKEN",
                        $('input:hidden[name="__RequestVerificationToken"]').val());
                },
                url: "?handler=MyAction",
                data: {
                    @nameof(Model.MyClassData): {
                        @nameof(Model.MyClassData.Name): "hello"
                    },
                    @nameof(Model.MyString): "hello2"
                },
                success: function (data) {
                    console.log(data)
                    calendar.refetchEvents();
                    onCloseModal();
                }
            });
        }
Razor Pagesで同じプロパティに対してInputとhidden Inputがあった場合、どちらが優先されるか
タイトルのとおり。 ビュー側に同じプロパティに対してhiddenとそうでないinputがあった場合に、BindPropertyはどのような動作をするのかを確認する。そんなことはしないだろうけれど気になった。
結論:先に書かれているほうが優先される。
hidden inputが先の場合
<form method="post">
    <input hidden asp-for="@Model.Message" />
    <input asp-for="@Model.Message" />
    <button type="submit">送信</button>
</form>
テキストボックスに「hello2」と入力して送信ボタンを押すと、Messageプロパティの値は「hello」のまま

hiddenなしのinputが先の場合
<form method="post">
    <input asp-for="@Model.Message" />
    <input hidden asp-for="@Model.Message" />
    <button type="submit">送信</button>
</form>
Messageプロパティの値は「hello2」となる。

【Razor Pages】複雑なオブジェクトのGetリクエストのバインドはどうなる?
以下のようなオブジェクトがあったとして、
    public class MyClass
    {
        public string Message { get; set; }
    }
このようにBindPropertyを使ってGetリクエストでクライアントからデータを受け取る場合、
        [BindProperty(SupportsGet = true)]
        public MyClass MyClass { get; set; }
<p>
    @Model.MyClass.Message
</p>
<p>
    <form>
        <p>
            Message: <input asp-for="@Model.MyClass.Message" />
            <button type="submit">送信</button>
        </p>
    </form>
</p>
そのときのクエリ文字列はどうなるのか、という確認です。
結論としては以下のようにデータをプロパティで受け取ることができ、

その際のクエリ文字列は以下のようになります。
このようにC#でオブジェクトのメンバーにアクセスするときと同じ表記で「.」で区切って対象のプロパティが指定されるということですね。
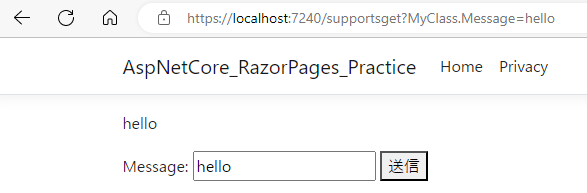
?MyClass.Message=hello
おまけで、ではさらに深い階層のプロパティの場合のクエリ文字列はどうなるかというと。
    public class MyClass
    {
        public string Message { get; set; }
        public MyClass2 MyClass2 { get; set; }

        public MyClass()
        {
            MyClass2 = new MyClass2();
        }
    }

    public class MyClass2
    {
        public string Message { get; set; }
    }
<p>
    <form>
        <p>
            Message: <input asp-for="@Model.MyClass.MyClass2.Message" />
            <button type="submit">送信</button>
        </p>
    </form>
</p>

こうなります。まあ、ですよね。

?MyClass.MyClass2.Message=hello
【Razor Pages】SupportsGetについて
クライアント側からサーバー側にデータを渡したい場合、publicプロパティに[BindProperty]属性をつけることで、クライアントから送られてきたデータを自動的にそのプロパティで受け取ることができる。 これによって、Httpリクエストのリクエストボディからデータを取得してプロパティに代入するなどのコードを記述する必要がなく、ロジックに集中できる。
[BindProperty]属性をつけただけであれば、Postリクエストを対象としてユーザからのデータがプロパティに入ることになる。 ではGetリクエスト(クエリ文字列でデータを渡す)の場合はというと、既定ではBindの対象外であり、明示するする必要がある。 この場合、[BindProperty(SupportsGet=true)]とする必要がある。
例えば以下のようにMessageプロパティにBindProperty属性をつける。
    public class SupportsGetModel : PageModel
    {

        [BindProperty]
        public string Message { get; set; }

        public SupportsGetModel()
        {
            this.Message = string.Empty;
        }

        public IActionResult OnGet()
        {
            var message = Message;

            return Page();
        }
    }
そして以下のようにクライアントからGetリクエストでMessageプロパティに値を送るようにする。
@page
@model AspNetCore_RazorPages_Practice.Pages.SupportsGetModel
@{
}

<p>
    @Model.Message
</p>

<p>
    <form>
        <p>
            Message: <input asp-for="@Model.Message" />
            <button type="submit">送信</button>
        </p>
    </form>
</p>
このビューの見た目は以下のとおり。

テキストボックスに「hello」と入力して「送信」ボタンを押すと、サーバー側ではMessageプロパティの値に変化はない。
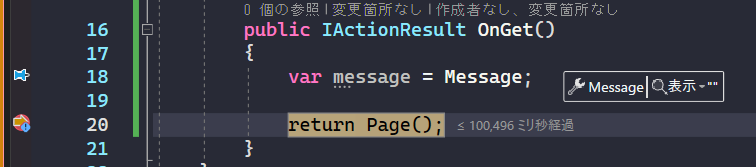
次にBindProperty属性にSupportsGet=trueをつけて、同様にデータを送信するとMessageプロパティにテキストボックスの値が入る。

このように表示される。

以上のようにGetリクエストでクライアントから送られてきたデータをプロパティで受け取りたい場合(バインディングしたい場合)は、BindProperty属性にSupportsGet=trueをつける必要がある。
MAUIでバックグラウンド(非アクティブ時でも)で処理を継続する(Android編)
はじめに
この記事は,以前にXamarin.Formsで行った「アプリケーションが非アクティブの状態でも動作を継続させる方法」のMAUI版です.
結論から言うと、個人的な趣味でメッセージングにCommunityToolkit.MvvmのWeakReferenceMessengerを使うようにしたぐらいで、あとはほぼそのまま使えました。
各プラットフォームごとに実装が異なり,この記事はAndroidについてです.
アプリケーションが非アクティブ(アプリをユーザーが操作中ではない)ときにも,継続して処理を行うことが目的.
Androidのバックグラウンドタスクの実行制限について
Android開発者サイトにもあるようにバックグラウンドタスクの実行には以下の制限があるため,非アクティブ時には一定時間後に停止する.
多くの Android アプリやサービスは同時に実行することができます。 たとえば、あるウィンドウでゲームをプレイしながら別のウィンドウでウェブをブラウジングしているときに、別のアプリで音楽を再生できます。 同時に実行するアプリが多いほど、システムに大きな負荷がかかります。 さらに多くのアプリやサービスがバックグラウンドで実行されると、システムにかかる負荷が増えて、音楽アプリが突然シャットダウンするなど、ユーザー エクスペリエンスが低下します。

Android 8.0 では、このような問題の発生頻度を抑えるため、ユーザーがアプリを直接操作していないときにアプリで実行できる動作を制限しています。 アプリの動作は次の 2 つの方法で制限されます。

- バックグラウンド サービスの制限事項: アプリがアイドル状態にある場合、バックグラウンド サービスの使用を制限します。 これは、ユーザーが認識しやすいフォアグラウンド サービスには適用されません。

- ブロードキャストの制限事項: 限定的な例外を除き、アプリはマニフェストを使用して暗黙的なブロードキャストを登録できません。 ただし、アプリは実行時にこれらのブロードキャストを登録でき、アプリを明確に対象とする明示的なブロードキャストについては、マニフェストを使って登録できます。
# 解決方法
この制限は以下の状態には適用されない.
- 可視アクティビティがある(アクティビティが開始されているか一時停止されているかに関係なく)。
- フォアグラウンド サービスを使用している。
- 別のフォアグラウンド アプリが、該当アプリのいずれかのサービスにバインドされるか、該当アプリのいずれかのコンテンツ プロバイダを使用することで、該当アプリに接続している。 たとえば、別のアプリが次のいずれかのサービスにバインドされると、アプリがフォアグラウンドになります。
- IME
- 壁紙サービス
- 通知リスナー
- 音声またはテキスト サービス
このうちのForeground Serviceを使用することで,上記の制限を受けないようにすることができる.
実装
MAUIからNativeのバックグラウンドタスクを実行する
iOSとAndroidではバックグラウンドタスクを実行する方法が大きく異なるため,インターフェースで共通化することができない.
Xamarin.Formsの記事のときはMessagingCenterを使ったが、今回はCommunityToolkit.MvvmのWeakReferenceMessengerを利用することで,各プラットフォームのバックグラウンドタスクを開始する.
https://robgibbens.com/backgrounding-with-xamarin-forms/robgibbens.com

また,各プラットフォームで実行しているバックグラウンドタスクからデータをMAUI側に送る場合にも同様にWeakReferenceMessengerを使う.
この部分については上記のチュートリアルの通りに行う.バックグラウンドでカウントアップして,それをUIに表示するシンプルなアプリ.
MAUI側の設定
MAUI側では,Native側から送られてくるデータを受け取るようにWeakReferenceMessengerのメッセージを購読する. WeakReferenceMessengerについてはこちらの動画がとてもわかり易いです。
MainPageのコンストラクタにでも以下のように記述する. IRecipientを継承し、コンストラクタでメッセージの購読を行う。対象のメッセージはネイティブ側から1秒間隔で送られてくるTickedMessage型のメッセージ。
このメッセージを受け取ったときの処理はIRecipient<TickedMessage>.Receiveメソッドに記載のとおりで、カウントを1増やしてLabel.Textを更新する、というもの。
Button_LongRunningTaskStart_ClickedとButton_LongRunningTaskStart_Clickedはそれぞれボタンが押されたときに、バックグラウンドのタスクの開始・停止を行う。これもWeakReferenceMessengerによるメッセージの受け渡しで行う。
using CommunityToolkit.Mvvm.Messaging;
using CommunityToolkit.Mvvm.Messaging.Messages;
using Maui_AndroidForegroundService.Messages;
using Maui_AndroidForegroundService.Tasks;

namespace Maui_AndroidForegroundService;

public partial class MainPage : ContentPage, IRecipient<TickedMessage>
{
    int count = 0;

    CancellationTokenSource cts = new CancellationTokenSource();

    public MainPage()
    {
        InitializeComponent();

        WeakReferenceMessenger.Default.Register<TickedMessage>(this);
    }


    void IRecipient<TickedMessage>.Receive(TickedMessage message)
    {
        count++;

        if (count == 1)
            counter.Text = $"Clicked {count} time";
        else
            counter.Text = $"Clicked {count} times";
    }

    private async void Button_LongRunningTaskStart_Clicked(object sender, EventArgs e)
    {
#if __ANDROID__
        var message = new StartLongRunningTaskMessage("");

        WeakReferenceMessenger.Default.Send(message);
#else
        var task = new CounterTask();
        await task.RunCounter(cts.Token);
#endif


    }

    private void Button_LongRunningTaskStop_Clicked(object sender, EventArgs e)
    {
#if __ANDROID__
        var message = new StopLongRunningTaskMessage("");

        WeakReferenceMessenger.Default.Send(message);
#else
        cts.Cancel();
#endif
    }
}
TickedMessageクラスはNative側から送られてくるデータを格納するためのクラス.
今回メッセージの中身として渡すものはないので、型引数を適当にstring型にしている。
using CommunityToolkit.Mvvm.Messaging.Messages;

namespace Maui_AndroidForegroundService.Messages;

public class TickedMessage : ValueChangedMessage<string>
{
    public TickedMessage(string value) : base(value)
    {
    }
}
Androidネイティブ側の設定
Native側ではForms側からバックグラウンドの開始,停止のメッセージを受け取るようにする.
MainActivity.cs内のOnCreateメソッド内にMessagingCenterのメッセージ購読処理を記述する.
メッセージを受け取った際に,サービスの開始,停止を行っている.
それぞれのメッセージStartLongRunningTaskMessage、StopLongRunningTaskMessage
using Android.App;
using Android.Content;
using Android.Content.PM;
using Android.OS;
using CommunityToolkit.Mvvm.Messaging;
using Maui_AndroidForegroundService.Messages;
using Maui_AndroidForegroundService.Platforms.Android;

namespace Maui_AndroidForegroundService;

[Activity(Theme = "@style/Maui.SplashTheme", MainLauncher = true, ConfigurationChanges = ConfigChanges.ScreenSize | ConfigChanges.Orientation | ConfigChanges.UiMode | ConfigChanges.ScreenLayout | ConfigChanges.SmallestScreenSize | ConfigChanges.Density)]
public class MainActivity : MauiAppCompatActivity, IRecipient<StartLongRunningTaskMessage>, IRecipient<StopLongRunningTaskMessage>
{

    protected override void OnCreate(Bundle savedInstanceState)
    {
        base.OnCreate(savedInstanceState);

        WeakReferenceMessenger.Default.Register<StartLongRunningTaskMessage>(this);
        WeakReferenceMessenger.Default.Register<StopLongRunningTaskMessage>(this);
    }

    void IRecipient<StartLongRunningTaskMessage>.Receive(StartLongRunningTaskMessage message)
    {
        var intent = new Intent(this, typeof(LongRunningTaskServcie));

        StopService(intent);

        if (Build.VERSION.SdkInt >= BuildVersionCodes.O)
        {
            StartForegroundService(intent);
        }
        else
        {
            StartService(intent);
        }
    }

    void IRecipient<StopLongRunningTaskMessage>.Receive(StopLongRunningTaskMessage message)
    {
        var intent = new Intent(this, typeof(LongRunningTaskServcie));
        StopService(intent);
    }
}
LongRunningTaskServiceはAndroidで今回バックグラウンドで実行されるサービスでServiceクラスを継承し,[Service]Attributeをつける.
サービスについて参考: docs.microsoft.com
これもほぼそのままですが、一点だけ変更点があります。
以下の部分でPendingIntentFlags.Immutableを指定しているところです。
PendingIntent pendingIntent = PendingIntent.GetActivity(Application.Context, _pendingIntentId, foregroundNotificationIntent, PendingIntentFlags.Immutable);
using Application = Android.App.Application;
using Android.App;
using Android.Content;
using Android.Graphics;
using Android.OS;
using Android.Runtime;
using AndroidX.Core.App;
using CommunityToolkit.Mvvm.Messaging;
using Maui_AndroidForegroundService.Messages;
using Maui_AndroidForegroundService.Tasks;
using OperationCanceledException = System.OperationCanceledException;


namespace Maui_AndroidForegroundService.Platforms.Android;

[Service]
public class LongRunningTaskServcie : Service
{
    CancellationTokenSource _cts;

    public override IBinder OnBind(Intent intent)
    {
        return null;
    }

    [return: GeneratedEnum]
    public override StartCommandResult OnStartCommand(Intent intent, [GeneratedEnum] StartCommandFlags flags, int startId)
    {
        _cts = new CancellationTokenSource();

        Task.Run(() =>
        {
            try
            {
                var counter = new CounterTask();

                counter.RunCounter(_cts.Token).Wait();
            }
            catch (OperationCanceledException)
            {
            }
            finally
            {
                if (_cts.IsCancellationRequested)
                {
                    var message = new CancelledMessage("");

                    MainThread.BeginInvokeOnMainThread(() =>
                    {
                        WeakReferenceMessenger.Default.Send(message);
                    });
                }
            }
        });

        var notification = CreateNotification();

        StartForeground(id: 1, notification: notification);

        //return base.OnStartCommand(intent, flags, startId);
        return StartCommandResult.NotSticky;
    }

    private Notification CreateNotification()
    {
        #region Create Channel
        string channelId = "ForegroundPracticeChannel_ID";
        string channelName = "ForegroundPracticeChannel_Name";
        string channelDescription = "The foreground practice channel for notifications";
        int _pendingIntentId = 1;


        NotificationManager notificationManager = (NotificationManager)Application.Context.GetSystemService(NotificationService);

        if (Build.VERSION.SdkInt >= BuildVersionCodes.O)
        {
            var channelNameJava = new Java.Lang.String(channelName);
            var channel = new NotificationChannel(channelId, channelNameJava, NotificationImportance.Low)
            {
                Description = channelDescription,
            };
            channel.EnableVibration(false);
            notificationManager.CreateNotificationChannel(channel);
        }

        #endregion

        #region Create Notification
        Intent foregroundNotificationIntent = new Intent(Application.Context, typeof(MainActivity));

        PendingIntent pendingIntent = PendingIntent.GetActivity(Application.Context, _pendingIntentId, foregroundNotificationIntent, PendingIntentFlags.Immutable);

        NotificationCompat.Builder builder = new NotificationCompat.Builder(Application.Context, channelId)
            .SetContentIntent(pendingIntent)
            .SetContentTitle("Foreground Practice!")
            .SetContentText("Foreground service started")
            .SetOngoing(true)
            .SetColor(ActivityCompat.GetColor(Application.Context, Resource.Color.colorAccent))
            //.SetLargeIcon(BitmapFactory.DecodeResource(Application.Context.Resources, Resource.Drawable.launcher_foreground))
            //.SetSmallIcon(Resource.Drawable.launcher_foreground);
            ;
        var notification = builder.Build();
        #endregion

        return notification;
    }

    public override void OnDestroy()
    {
        if (_cts != null)
        {
            _cts.Token.ThrowIfCancellationRequested();
            _cts.Cancel();
        }
        base.OnDestroy();
    }
}
メモ:
OnstartCommandメソッドの戻り値について
  ●START_NOT_STICKY
  Serviceがkillされた場合、Serviceは再起動しません。

 ●START_STICKY
  デフォルトではこの設定になります。
  Serviceがkillされた場合、直ちにServiceの再起動を行います。
  再起動時、前回起動時のIntentは再配信されず、
  複数のServiceが起動していても再起動するServiceは1つです。

 ●START_REDELIVER_INTENT
  Serviceがkillされた場合、直ちにServiceの再起動を行います。
  再起動時、最後に使用したIntentを使用します。
  また、複数のServiceが起動している場合、すべて再起動します。

 ●START_STICKY_COMPATIBLILITY
  START_STICKYの互換バージョンです。Android2.0未満ではこれがデフォルト設定です。
実際に実行するタスクはこちら.
using CommunityToolkit.Mvvm.Messaging;
using Maui_AndroidForegroundService.Messages;

namespace Maui_AndroidForegroundService.Tasks;

public class CounterTask
{
    public async Task RunCounter(CancellationToken token)
    {
        await Task.Run(async () =>
        {
            for (long i = 0; i < long.MaxValue; i++)
            {
                token.ThrowIfCancellationRequested();

                await Task.Delay(1000);
                var message = new TickedMessage("");

                MainThread.BeginInvokeOnMainThread(() =>
                {
                    WeakReferenceMessenger.Default.Send(message);
                });
            }
        }, token);
    }
}
MAUIから実行
MainPageに開始,停止を行うボタンと,バックグラウンドタスクでのカウントを表示するラベルを配置する.
<?xml version="1.0" encoding="utf-8" ?>
<ContentPage
    x:Class="Maui_AndroidForegroundService.MainPage"
    xmlns="http://schemas.microsoft.com/dotnet/2021/maui"
    xmlns:x="http://schemas.microsoft.com/winfx/2009/xaml">

    <StackLayout>
        <Label
            x:Name="counter"
            FontSize="100"
            HorizontalOptions="Center"
            Text="{Binding Message}"
            VerticalOptions="CenterAndExpand" />
        <Button
            x:Name="Button_LongRunningTaskStart"
            Clicked="Button_LongRunningTaskStart_Clicked"
            Text="Start Task" />
        <Button
            x:Name="Button_LongRunningTaskStop"
            Clicked="Button_LongRunningTaskStop_Clicked"
            Text="Stop Task" />
    </StackLayout>

</ContentPage>
それぞれのボタンが押されたときにMessagingCenterでメッセージを送る.
Foreground Serviceとしてタスクを実行する部分
Foreground Serviceとしてタスクを実行すれば,制限がかからない.
Foreground Serviceとして実行するためにはNotificationクラスのインスタンスを渡す必要がある.
今回はすでに以下のようにNotification Channelとそれを使用するNotificationオブジェクトを作成するメソッドをLongRunningTaskServiceに用意してある.
    private Notification CreateNotification()
    {
        #region Create Channel
        string channelId = "ForegroundPracticeChannel_ID";
        string channelName = "ForegroundPracticeChannel_Name";
        string channelDescription = "The foreground practice channel for notifications";
        int _pendingIntentId = 1;


        NotificationManager notificationManager = (NotificationManager)Application.Context.GetSystemService(NotificationService);

        if (Build.VERSION.SdkInt >= BuildVersionCodes.O)
        {
            var channelNameJava = new Java.Lang.String(channelName);
            var channel = new NotificationChannel(channelId, channelNameJava, NotificationImportance.Low)
            {
                Description = channelDescription,
            };
            channel.EnableVibration(false);
            notificationManager.CreateNotificationChannel(channel);
        }

        #endregion

        #region Create Notification
        Intent foregroundNotificationIntent = new Intent(Application.Context, typeof(MainActivity));

        PendingIntent pendingIntent = PendingIntent.GetActivity(Application.Context, _pendingIntentId, foregroundNotificationIntent, PendingIntentFlags.Immutable);

        NotificationCompat.Builder builder = new NotificationCompat.Builder(Application.Context, channelId)
            .SetContentIntent(pendingIntent)
            .SetContentTitle("Foreground Practice!")
            .SetContentText("Foreground service started")
            .SetOngoing(true)
            .SetColor(ActivityCompat.GetColor(Application.Context, Resource.Color.colorAccent))
            //.SetLargeIcon(BitmapFactory.DecodeResource(Application.Context.Resources, Resource.Drawable.launcher_foreground))
            //.SetSmallIcon(Resource.Drawable.launcher_foreground);
            ;
        var notification = builder.Build();
        #endregion

        return notification;
    }
そして,OnStartCommandメソッドで以下のようにForeground Serviceを開始する.
            //Notificationの作成(Android 8.0以降では必須)
            var notification = CreateNotification();

            //Foreground Serviceとして実行
            //id:サービスを識別するためにアプリケーション内で一意である整数値。
            //notification:サービスが実行されている間、Android がステータスバーに表示する Notification オブジェクト。
            StartForeground(id: 1, notification: notification);
ForegroundServiceを許可する
最後に,Foreground Serviceを実行するためのPermissionをAndroidManifest.xmlに追加する。
<?xml version="1.0" encoding="utf-8"?>
<manifest xmlns:android="http://schemas.android.com/apk/res/android">
    <application android:allowBackup="true" android:icon="@mipmap/appicon" android:roundIcon="@mipmap/appicon_round" android:supportsRtl="true"></application>
    <uses-permission android:name="android.permission.ACCESS_NETWORK_STATE" />
    <uses-permission android:name="android.permission.INTERNET" />
  <uses-permission android:name="android.permission.FOREGROUND_SERVICE" />
</manifest>
実行する
これで実行すると,先程と同様にカウントアップが始まるが,今度はアプリケーションを非アクティブにしても動作は継続される.
実行中はこのように通知が表示され,ストップすると消える.

アプリを終了させてもForgroundServiceが動き続ける
アプリを終了させても明示的にForeground Serviceを終了させないとForeground Serviceだけ動き続けるようだ.
アプリ終了時にどうしたらいいか調べなきゃ。
ソースコード
Xamarin.FormsでBackgroundタスク
https://robgibbens.com/backgrounding-with-xamarin-forms/robgibbens.com
この記事と動画のとおりにXamarin.FormsでAndroid,iOSの両方でBackgroundタスクを実行するテストを行った.
MessagingCenterを使用し,以下を行っている.
- Android,iOSの各プロジェクトで実装したタスク,サービスを開始,停止
- Sharedが送信,Nativeが受信
- タスク,サービスからのデータの送受信
- Nativeが送信,Sharedが受信
- 受信したらUIを更新.

0.25秒ごとに数字をカウントアップしていく単純なもの.

「START LONG RUNNING TASK」ボタンを押すと開始する.
このアプリが非アクティブのときにも動いていることがわかるように10カウント毎に通知されるようにしてある.
日アクティブでも動作していることがわかる.
問題
しかし,一定時間(1分ぐらい?)経過すると,カウントが停止する.
これは,Android 8.0(APIレベル26以降)ではバッテリーやCPUなどのリソースの節約のために一定時間でバックグラウンドのタスクを終了するようになったため.
もともと,バックグラウンドでも位置情報を取得し続けるために調べはじめたことで,やはり同様に位置情報の取得に関しても制限がかかるようになっていた.
解決の方針
以下のページに詳しく書いてある.
JobSchedulerを使う
例えば,
多くの場合、アプリではバックグラウンド サービスを JobScheduler ジョブに置き換えることができます。
とあることから,Serviceを使って動かし続けるのではなくJobSchedulerで定期的にスポット的に実行することで実現できるし,それがより良い方法のようだ.
FCM(Firebase Cloud Messaging)を使う
FCMを使ったPush通知の仕組みを使うと,アプリを実行していなくてもFCMを介したメッセージの受信ができる.
それを起点とした処理を記述することができるので,FCMから定期的にメッセージを送ればバックグラウンドで定期継続実行が実現できる.
FCM+Azure Notification Hubsを使ったPush通知の実装方法は公式ドキュメントに詳細に解説されていて,そのとおりに行えば難しくはない.
しかし,当然ネットワークにつながっている必要があったり,台数とか金額とか,ちょっとローカルでバックグラウンド処理したいだけなので,要件には合わない.
Bound Serviceを使う
バインドされたサービスというものがあり,以下のようにも書かれている.
注: これらのルールは バインドされたサービスには一切影響を与えません。 アプリでバインドされたサービスを定義している場合、アプリがフォアグラウンドにあるかどうかに関係なく、別のコンポーネントをそのサービスにバインドできます。
バインドされたサービスとは何かについては以下のページに書かれている.
Xamarin.Androidでの実装についてはこちら.
何やら複雑そうだ. これはサービスを(端末内で)サーバーのように動作させて,リクエストとそのレスポンスという形式のようだ.
Foreground Serviceを使う
Youtubeとか動画,音楽再生アプリで再生中に上に通知が出て,実行中だと表されるもの.

ForegroundServiceの実装方法. シンプルでわかりやすい↓
ただし,NotificationをStartForegroundメソッドにわたす際には,Channelを作成しておく必要があるので注意.
        private void CreateNotificationChannel()
        {
            _notificationManager = (NotificationManager)Android.App.Application.Context.GetSystemService(Android.App.Application.NotificationService);
            if (Build.VERSION.SdkInt >= BuildVersionCodes.O)
            {
                var channelNameJava = new Java.Lang.String(_channelName);
                var channel = new NotificationChannel(_channelId, channelNameJava, NotificationImportance.Default)
                {
                    Description = _channelDescription,
                };
                _notificationManager.CreateNotificationChannel(channel);
            }

            _channelInitialized = true;
        }
いまのところ
サーバーのように待ち受けている必要も,リアルタイムである必要もないので,定期実行のJobSchedulerがおそらくシンプルなのではないかと思う.
結果
JobScheduler
JobSchedulerを使ったところ,一定時間経過してもバックグラウンドで動作し続けたが,最低実行間隔は後述のとおり15分間であることを忘れないように.
この記事の冒頭部分に,
Google I/O 2018において発表された「JetPack」において、Androidのバージョンに応じてそれらの処理を切り替えるWorkManagerが含まれているので、今後はそちらを利用していくべきかと思います。こちらを利用すると、内部的には以下のように処理が切り替わるそうです。
とあるので,WorkManagerを使わなければならない可能性が出てきた.
上記記事は最低実行間隔について検証もしている.
定期実行する場合、ジョブID毎に実行間隔を指定でき、最小間隔は約15分。それより小さい時間間隔を指定しても15分に設定される。
実行間隔は前後し、正確な周期は保証されない。
最大実行時間は約10分間。(5.1.1までは1分間だった模様)
DOZE状態では動作しなくなり、一定のタイミングで訪れるメンテナンスウィンドウでまとめて実行される。
同時に実行可能なジョブの数には上限があり、環境によって異なる。
なんと,一回のジョブの最大実行時間は10分ということなので,一回のJobでループ回しっぱなしというのは当然途中で止まる.
しかも,OSが省エネ動作を行うのでその実行間隔はだんだん開いたりするようだ.
Jobの設定についてはJobInfoクラスのBuilderメソッドで実行間隔などを指定できるので,それを使う.
JobInfo info = new JobInfo
        .Builder(0) // JobID=0の指定
        .setPersisted(true) // 端末再起動後も実行する
        .setPeriodic(0, JobInfo.getMinFlexMillis()) // 実行間隔=0と実行遅延許容時間の指定
        .setRequiredNetworkType(JobInfo.NETWORK_TYPE_NONE) // ネットワーク状態と無関係に実行
        .build();
scheduler.schedule(info);
ふむふむ.
あと,端末再起動後もJobを実行するには以下のパーミッションを得る必要があるようだ. このあたりは試していない.
<uses-permission android:name="android.permission.RECEIVE_BOOT_COMPLETED" />
↑setPersisted(true)にすると実行時エラーになる.RECEIVE_BOOT_COMPLETEDにチェックつけてるのに.
JobSchedulerについてはこちらも詳しい.
他にも参考 Xamarin.Androidでの実装についてはこちら.
やってみた結果
やってみたが,非アクティブ時には定期的には実行されなかった.
どういうタイミングかはよくわからなかったが,気がついたら実行されていた.
Foreground Service
foregroundServiceを使ったらできた.
詳しくは別で書く.
こちら,とても詳しい qiita.com
Androidの各種サービスについて
OnStartCommandについて説明がある.
ソースコード
以下の3つのブランチがある
- foreground_service
- foregroundサービスとしてタスクを実行
- use_job_service
- JobServiceを使った定期実行
- 15分間隔
- master
- 普通のService
- バックグラウンド1分で停止
MAUIでQRコードを読み取る
こちらの動画の内容をやってみたメモ。
ZXing.Net.Mauiをインストール
NugetパッケージマネージャでZXing.Net.Mauiを検索する。
このパッケージは現時点ではプレビューなので検索欄の右側のInclude prereleaseにチェックをつけておく。

UseBarcodeReaderを追加する
MauiProgram.csを開き、builderにUseBarcodeReader()を追加する。
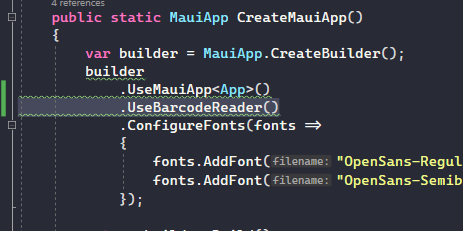
ConfigureMauiHandlerを追加する
MauiのHandlerについては全然わかっていないけれど、動画の主によるとZXing.Net.Mauiはプレビューのため今はこの記述が必要とのこと。
    public static MauiApp CreateMauiApp()
    {
        var builder = MauiApp.CreateBuilder();
        builder
            .UseMauiApp<App>()
            .UseBarcodeReader()
            .ConfigureFonts(fonts =>
            {
                fonts.AddFont("OpenSans-Regular.ttf", "OpenSansRegular");
                fonts.AddFont("OpenSans-Semibold.ttf", "OpenSansSemibold");
            })
            .ConfigureMauiHandlers(h =>
            {
                h.AddHandler(typeof(ZXing.Net.Maui.Controls.CameraBarcodeReaderView), typeof(CameraBarcodeReaderViewHandler));
                h.AddHandler(typeof(ZXing.Net.Maui.Controls.CameraView), typeof(CameraViewHandler));
                h.AddHandler(typeof(ZXing.Net.Maui.Controls.BarcodeGeneratorView), typeof(BarcodeGeneratorViewHandler));
            });

        return builder.Build();
    }
AndroidManifest.xmlにCAMERAを追加
カメラを使うのでマニフェストにカメラを追加する。
AndroidManifest.xmlを開いて以下のように<uses-permission android:name="android.permission.CAMERA"を追加する。

バーコード読み取り用のカメラコントロールを追加
ZXing.Net.Mauiにはバーコード読み取り用カメラコントロールが用意されているので、それをXAMLに追加する。
まずZXingのアセンブリを追加する。

次にCameraBarcodeReaderView(barcodeReader)を追加する。
ついでに、QRコードを読み取った結果の文字列を表示するLabel(barcodeResult)を追加してある。

CameraBarcodeReaderViewの各プロパティの意味も聞き取れていないけれど、BarcodesDetectedがバーコード読み取り成功時のイベントハンドラということはわかる。
イベントハンドラを定義
横着してコードビハインド(MainPage.xaml.cs)に以下のように書く。
読み取った値(e.Results[0].Value)をLabelに表示させる。
    private void CameraBarcodeReaderView_BarcodesDetected(object sender, ZXing.Net.Maui.BarcodeDetectionEventArgs e)
    {
        MainThread.BeginInvokeOnMainThread(() =>
        {
            barcodeResult.Text = $"{e.Results[0].Value} {e.Results[0].Format}";
        });
    }
動かしてみる
こちらのサービスを使ってQRコードを作成する。 「こんにちは、せかい」という文字列を表すQRコードを作成した。

QRコードを読み取り、画面に「こんにちは、せかい」と表示されたらOK。
読み取り前。

読み取り後。

文字化けしてしまった…
アルファベットであれば問題ない。
文字化け問題は後で解決するとして、とりあえず動画のとおりにやることでMAUIで作ったAndroidアプリ上でQRコード読み取り機能が使えることが確認できた。
とても簡単に使えたので、これからが楽しみ。