Xamarin.Formsでバックグラウンド(非アクティブ時でも)で処理を継続する(Android編)
はじめに
この記事は,アプリケーションが非アクティブの状態でも動作を継続させる方法.
各プラットフォームごとに実装が異なり,この記事はAndroidについて.
アプリケーションが非アクティブ(アプリをユーザーが操作中ではない)ときにも,継続して処理を行うことが目的.
例えば,ランニングの経路を記録するアプリを作る場合,非アクティブな状態でも定期的に位置情報を取得する必要がある.これについては次の記事に書いてある.
Androidのバックグラウンドタスクの実行制限について
Android開発者サイトにもあるようにバックグラウンドタスクの実行には以下の制限があるため,非アクティブ時には一定時間後に停止する.
多くの Android アプリやサービスは同時に実行することができます。 たとえば、あるウィンドウでゲームをプレイしながら別のウィンドウでウェブをブラウジングしているときに、別のアプリで音楽を再生できます。 同時に実行するアプリが多いほど、システムに大きな負荷がかかります。 さらに多くのアプリやサービスがバックグラウンドで実行されると、システムにかかる負荷が増えて、音楽アプリが突然シャットダウンするなど、ユーザー エクスペリエンスが低下します。

Android 8.0 では、このような問題の発生頻度を抑えるため、ユーザーがアプリを直接操作していないときにアプリで実行できる動作を制限しています。 アプリの動作は次の 2 つの方法で制限されます。

- バックグラウンド サービスの制限事項: アプリがアイドル状態にある場合、バックグラウンド サービスの使用を制限します。 これは、ユーザーが認識しやすいフォアグラウンド サービスには適用されません。

- ブロードキャストの制限事項: 限定的な例外を除き、アプリはマニフェストを使用して暗黙的なブロードキャストを登録できません。 ただし、アプリは実行時にこれらのブロードキャストを登録でき、アプリを明確に対象とする明示的なブロードキャストについては、マニフェストを使って登録できます。
# 解決方法
この制限は以下の状態には適用されない.
- 可視アクティビティがある(アクティビティが開始されているか一時停止されているかに関係なく)。
- フォアグラウンド サービスを使用している。
- 別のフォアグラウンド アプリが、該当アプリのいずれかのサービスにバインドされるか、該当アプリのいずれかのコンテンツ プロバイダを使用することで、該当アプリに接続している。 たとえば、別のアプリが次のいずれかのサービスにバインドされると、アプリがフォアグラウンドになります。
- IME
- 壁紙サービス
- 通知リスナー
- 音声またはテキスト サービス
このうちのForeground Serviceを使用することで,上記の制限を受けないようにすることができる.
実装
Xamarin.FormsからNativeのバックグラウンドタスクを実行する
iOSとAndroidではバックグラウンドタスクを実行する方法が大きく異なるため,インターフェースで共通化することができない.
そこで,MessagingCenterを利用することで,各プラットフォームのバックグラウンドタスクを開始する.
https://robgibbens.com/backgrounding-with-xamarin-forms/robgibbens.com

また,各プラットフォームで実行しているバックグラウンドタスクからデータをXamarin.Forms側に送る場合にも同様にMessagingCenterを使う.
この部分については上記のチュートリアルの通りに行う.バックグラウンドでカウントアップして,それをUIに表示するシンプルなアプリ.
Xamarin.Forms側の設定
Forms側では,Native側から送られてくるデータを受け取るようにMessagingCenterのメッセージを購読する.
MainPageのコンストラクタにでも以下のように記述する.
            MessagingCenter.Subscribe<TickedMessage>(this, nameof(TickedMessage), message =>
            {
                Message = message.Message;
            });
TickedMessageクラスはNative側から送られてくるデータを格納するためのクラス.
    public class TickedMessage
    {
        public string Message { get; set; }
    }
これで,NativeからTickedMessageオブジェクトのメッセージが送られてきたときに,その内容をMainPage内のMessageプロパティに入れる処理が行われる.
Android側の設定
Native側ではForms側からバックグラウンドの開始,停止のメッセージを受け取るようにする.
MainActivity.cs内のOnCreateメソッド内にMessagingCenterのメッセージ購読処理を記述する.
メッセージを受け取った際に,サービスの開始,停止を行っている.
            //Forms側からのバックグラウンドタスク開始,停止のメッセージ購読
            MessagingCenter.Subscribe<StartLongRunningTaskMessage>(this, nameof(StartLongRunningTaskMessage), _ =>
            {
                var intent = new Intent(this, typeof(LongRunningTaskService));
                StopService(intent);//タスクが重複しないように終了させてから.
                //Android8.0以上はStartForegroundServiceを使う.
                if (Build.VERSION.SdkInt >= BuildVersionCodes.O)
                {
                    StartForegroundService(intent);
                }
                else
                {
                    StartService(intent);
                }
            });
            MessagingCenter.Subscribe<StopLongRunningTaskMessage>(this, nameof(StopLongRunningTaskMessage), _ =>
            {
                var intent = new Intent(this, typeof(LongRunningTaskService));
                StopService(intent);
            });
LongRunningTaskServiceはAndroidで実行されるサービスを表すクラスで,Serviceクラスを継承し,[Service]Attributeをつける.
サービスについて参考: docs.microsoft.com
   [Service]
    public class LongRunningTaskService : Service
    {
        CancellationTokenSource _cts;

        public override IBinder OnBind(Intent intent)
        {
            return null;
        }

        public override StartCommandResult OnStartCommand(Intent intent, StartCommandFlags flags, int startId)
        {
            _cts = new CancellationTokenSource();

            Task.Run(() => {
                try
                {
                    //Xamarin.Fomrs側のコードを実行する.
                                        //処理自体は共通のコードを実行したい
                    var counter = new TaskCounter();
                    counter.RunCounter(_cts.Token).Wait();
                }
                catch (OperationCanceledException)
                {
                }
                finally
                {
                    if (_cts.IsCancellationRequested)
                    {
                        var message = new CancelledMessage();
                        Device.BeginInvokeOnMainThread(
                            () => MessagingCenter.Send(message, "CancelledMessage")
                        );
                    }
                }

            }, _cts.Token);

            return StartCommandResult.Sticky;
        }

        public override void OnDestroy()
        {
            if (_cts != null)
            {
                _cts.Token.ThrowIfCancellationRequested();

                _cts.Cancel();
            }
            base.OnDestroy();
        }
    }
メモ:
OnstartCommandメソッドの戻り値について
  ●START_NOT_STICKY
  Serviceがkillされた場合、Serviceは再起動しません。

 ●START_STICKY
  デフォルトではこの設定になります。
  Serviceがkillされた場合、直ちにServiceの再起動を行います。
  再起動時、前回起動時のIntentは再配信されず、
  複数のServiceが起動していても再起動するServiceは1つです。

 ●START_REDELIVER_INTENT
  Serviceがkillされた場合、直ちにServiceの再起動を行います。
  再起動時、最後に使用したIntentを使用します。
  また、複数のServiceが起動している場合、すべて再起動します。

 ●START_STICKY_COMPATIBLILITY
  START_STICKYの互換バージョンです。Android2.0未満ではこれがデフォルト設定です。
実際に実行するタスクはこちら.
    public class TaskCounter
    {
        //このメソッドがバックグラウンドで実行される
        public async Task RunCounter(CancellationToken token)
        {
            await Task.Run(async () =>
            {
                for (long i = 0; i < long.MaxValue; i++)
                {
                    token.ThrowIfCancellationRequested();

                    await Task.Delay(1000);
                    var message = new TickedMessage
                    {
                        Message = i.ToString()
                    };

                    MainThread.BeginInvokeOnMainThread(() =>
                    {
                        MessagingCenter.Send<TickedMessage>(message, nameof(TickedMessage));
                    });
                }
            }, token);
        }
    }
Xamarin.Formsから実行
MainPageに開始,停止を行うボタンと,バックグラウンドタスクでのカウントを表示するラベルを配置する.
<?xml version="1.0" encoding="utf-8" ?>
<ContentPage
    x:Class="XFForegroundServicePractice.MainPage"
    xmlns="http://xamarin.com/schemas/2014/forms"
    xmlns:x="http://schemas.microsoft.com/winfx/2009/xaml"
    xmlns:d="http://xamarin.com/schemas/2014/forms/design"
    xmlns:mc="http://schemas.openxmlformats.org/markup-compatibility/2006"
    mc:Ignorable="d">

    <StackLayout>
        <!--  Place new controls here  -->
        <Label
            FontSize="100"
            HorizontalOptions="Center"
            Text="{Binding Message}"
            VerticalOptions="CenterAndExpand" />
        <Button
            x:Name="Button_LongRunningTaskStart"
            Clicked="Button_LongRunningTaskStart_Clicked"
            Text="Start Task" />
        <Button
            x:Name="Button_LongRunningTaskStop"
            Clicked="Button_LongRunningTaskStop_Clicked"
            Text="Stop Task" />
    </StackLayout>

</ContentPage>
それぞれのボタンが押されたときにMessagingCenterでメッセージを送る.
        private void Button_LongRunningTaskStart_Clicked(object sender, EventArgs e)
        {
            var message = new StartLongRunningTaskMessage();
            MessagingCenter.Send(message, nameof(StartLongRunningTaskMessage));
        }

        private void Button_LongRunningTaskStop_Clicked(object sender, EventArgs e)
        {
            var message = new StopLongRunningTaskMessage();
            MessagingCenter.Send(message, nameof(StopLongRunningTaskMessage));
        }
ここまででXamarin.FormsからAndroidのバックグラウンドタスクを実行できる.
ただし,この時点では前述の制限がかかり,非アクティブな状態では1分ほどで停止する.
実行結果
この時点での実行結果は以下のとおり.
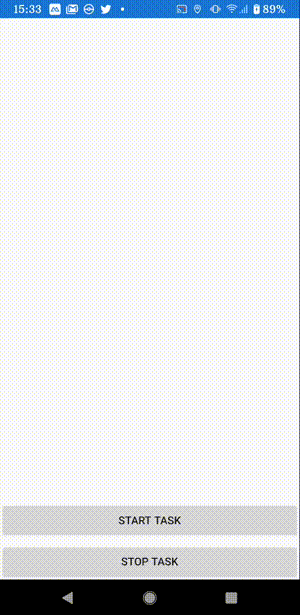
スタートボタンを押すとカウントアップされていき,アプリを切り替えたり,ホーム画面を表示させている間もカウントアップが継続していることがわかる.
非アクティブにして1分以上経過すると,カウントアップが止まっていることも確認できる.
Foreground Serviceとしてタスクを実行する
Foreground Serviceとしてタスクを実行すれば,制限がかからない.
Foreground Serviceとして実行するためにはNotificationクラスのインスタンスを渡す必要がある.
これはForeground Serviceとしてタスクが開始されたことをユーザーに通知するため.
以下のようにNotification Channelとそれを使用するNotificationオブジェクトを作成するメソッドを用意する.
        //フォアグラウンドサービス用のNotification ChannelとNotificationを作成する
        private Notification CreateNotification()
        {
            #region Create Channel
            string channelId = "foregroundpractice";
            string channelName = "foregroundpractice";
            string channelDescription = "The foreground channel for notifications";
            int _pendingIntentId = 1;

            NotificationManager _notificationManager;
            _notificationManager = (NotificationManager)Android.App.Application.Context.GetSystemService(Android.App.Application.NotificationService);
            if (Build.VERSION.SdkInt >= BuildVersionCodes.O)
            {
                var channelNameJava = new Java.Lang.String(channelName);
                var channel = new NotificationChannel(channelId, channelNameJava, NotificationImportance.Low)
                {
                    Description = channelDescription,
                };
                channel.EnableVibration(false);
                _notificationManager.CreateNotificationChannel(channel);
            }
            #endregion

            #region Create Notification
            Intent foregroundNotificationIntent = new Intent(Android.App.Application.Context, typeof(MainActivity));

            PendingIntent pendingIntent = PendingIntent.GetActivity(Android.App.Application.Context, _pendingIntentId, foregroundNotificationIntent, PendingIntentFlags.OneShot);

            NotificationCompat.Builder builder = new NotificationCompat.Builder(Android.App.Application.Context, channelId)
                .SetContentIntent(pendingIntent)
                .SetContentTitle("ForegroundServiceApp")
                .SetContentText("Foreground service started")
                .SetOngoing(true)
                .SetColor(ActivityCompat.GetColor(Android.App.Application.Context, Resource.Color.colorAccent))
                .SetLargeIcon(BitmapFactory.DecodeResource(Android.App.Application.Context.Resources, Resource.Drawable.launcher_foreground))
                .SetSmallIcon(Resource.Drawable.launcher_foreground);

            var notification = builder.Build();
            #endregion

            return notification;
        }
そして,OnStartCommandメソッドで以下のようにForeground Serviceを開始する.
            //Notificationの作成(Android 8.0以降では必須)
            var notification = CreateNotification();

            //Foreground Serviceとして実行
            //id:サービスを識別するためにアプリケーション内で一意である整数値。
            //notification:サービスが実行されている間、Android がステータスバーに表示する Notification オブジェクト。
            StartForeground(id: 1, notification: notification);
しかし,Foreground Serviceを実行するためにはPermissionが必要で,このままではエラーになる.
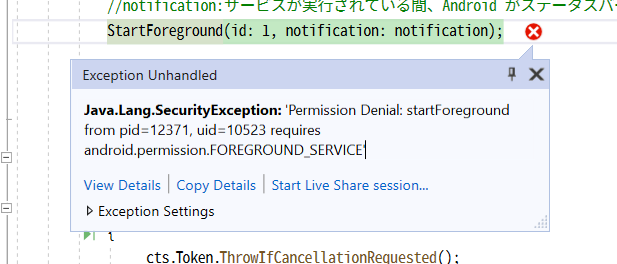
Foreground Serviceを許可する
AndroidプロジェクトのプロパティからPermissionを与える.

またはAndroidManifest.xmlに以下のようにPermissionを追加する.
<?xml version="1.0" encoding="utf-8"?>
<manifest xmlns:android="http://schemas.android.com/apk/res/android" android:versionCode="1" android:versionName="1.0" package="com.companyname.xfforegroundservicepractice" android:installLocation="auto">
    <uses-sdk android:minSdkVersion="21" android:targetSdkVersion="28" />
    <application android:label="XFForegroundServicePractice.Android"></application>
    <uses-permission android:name="android.permission.ACCESS_NETWORK_STATE" />

<!--これ-->
    <uses-permission android:name="android.permission.FOREGROUND_SERVICE" />

</manifest>
これで実行すると,先程と同様にカウントアップが始まるが,今度はアプリケーションを非アクティブにしても動作は継続される.
実行中はこのように通知が表示され,ストップすると消える.

追記:
アプリを終了させても明示的にForeground Serviceを終了させないとForeground Serviceだけ動き続けるようだ.よく調べなければ.
ソースコード
- masterブランチは制限がかかるバックグラウンドサービス
- ForegroundServiceブランチは制限がかからないもの
20210606追記:
AndroidのターゲットバージョンをAndroid10に変更した。 すると、ACCESS_BACKGROUND_LOCATIONのパーミッションを求められた。
