ExcelでTSVファイルを開く方法
まずExcelを起動する.
次にExcelのDataタブを選択して,以下のようにGet DataからFrom File > From Text/CSVを選択します.

ファイル選択ダイアログが開くので,読み込みたいTSVファイルを選択します.このとき,以下のようにAll Files(*.*)を選択しておきます.
以下のように読み込み結果のプレビューが表示されます.

日本語が文字化けしている場合は,左上に文字コードを選択するドロップダウンリストがあるので,そこから適切な文字コードを選択します.

これで下にある「Load」ボタンを押せばExcelに読み込まれます.
このプレビュー画面では,データ区切り記号も選択できるので,CSV,TSVに限らず他の形式のデータも読み込む事ができます(セミコロン区切り,とか).

読み込みが完了すると以下のように表示されます.

ExcelでTSVファイルを開く方法
まずExcelを起動する.
次にExcelのDataタブを選択して,以下のようにGet DataからFrom File > From Text/CSVを選択します.

ファイル選択ダイアログが開くので,読み込みたいTSVファイルを選択します.このとき,以下のようにAll Files(*.*)を選択しておきます.
以下のように読み込み結果のプレビューが表示されます.

日本語が文字化けしている場合は,左上に文字コードを選択するドロップダウンリストがあるので,そこから適切な文字コードを選択します.

これで下にある「Load」ボタンを押せばExcelに読み込まれます.
このプレビュー画面では,データ区切り記号も選択できるので,CSV,TSVに限らず他の形式のデータも読み込む事ができます(セミコロン区切り,とか).

読み込みが完了すると以下のように表示されます.

Xamarin.Forms : Sharpnadoでドラッグアンドドロップ可能なリストを作成するメモ
SharpnadoのGitHubリポジトリにあるサンプル動画でわかるように,このライブラリが提供する機能の一つとしてリスト状に表示した各アイテムをドラッグアンドドロップで位置を入れ替えることができるHorizontalListViewというコントロールがあります.
HorizontalListViewというコントロールですが,名前にHorizontalとついているので水平方向のリスト表示だけなのかと思いますが,縦方向も表示できます.
このメモは,このコントロールを使うための手順です.
Sharpnado.Presentation.Formsをインストールする
NugetでSharpnado.Presentation.Formsをインストールします.

プラットフォームごとの準備
Sharpnadoを使うために,各プラットフォームのプロジェクトでほんの少し準備があります.
Android
AndroidプロジェクトのMainActivity.csのOnCreateメソッド内で,以下のようにSharpnadoInitializer.Initialize()を追加します.
        protected override void OnCreate(Bundle savedInstanceState)
        {
            TabLayoutResource = Resource.Layout.Tabbar;
            ToolbarResource = Resource.Layout.Toolbar;

            base.OnCreate(savedInstanceState);

            Xamarin.Essentials.Platform.Init(this, savedInstanceState);
            global::Xamarin.Forms.Forms.Init(this, savedInstanceState);

            SharpnadoInitializer.Initialize();//これ

            LoadApplication(new App());
        }
iOS
iOSではAppDelegate.csのFinishedLaunchingメソッド内に以下のように追加します.
        public override bool FinishedLaunching(UIApplication app, NSDictionary options)
        {
            global::Xamarin.Forms.Forms.Init();

            SharpnadoInitializer.Initialize();//これ

            LoadApplication(new App());

            return base.FinishedLaunching(app, options);
        }
ContentPage内での使い方
まずは名前空間を追加します.
<ContentPage
...
    xmlns:renderedViews="clr-namespace:Sharpnado.Presentation.Forms.RenderedViews;assembly=Sharpnado.Presentation.Forms"
...
>
これでHorizontalListViewをContentPage内で使用する準備ができました.
HorizontalListViewを使う場合の基本的なVisual Treeの構成は以下のとおりです. 構造がわかりやすいように要素名だけにしています
        <renderedViews:HorizontalListView>
            <renderedViews:HorizontalListView.ItemTemplate>
                <DataTemplate>
                    <ViewCell>

                        <!-- ここにアイテムの見た目を定義する -->

                    </ViewCell>
                </DataTemplate>
            </renderedViews:HorizontalListView.ItemTemplate>
        </renderedViews:HorizontalListView>
これに様々なプロパティを追加し,アイテムの見た目の定義を入れると以下のようになります.
        <renderedViews:HorizontalListView
            CollectionPadding="10"
            ColumnCount="1"
            EnableDragAndDrop="True"
            ItemHeight="160"
            ItemSpacing="30"
            ItemsSource="{Binding People}"
            ListLayout="Grid"
            VerticalOptions="FillAndExpand">
            <renderedViews:HorizontalListView.ItemTemplate>
                <DataTemplate>
                    <ViewCell>
                        <Grid>
                            <Frame
                                Margin="10,0"
                                BorderColor="Green"
                                HasShadow="True">
                                <StackLayout Orientation="Horizontal">
                                    <Image
                                        Aspect="AspectFill"
                                        Source="{Binding ImageSrc}"
                                        WidthRequest="100" />
                                    <Label
                                        Margin="5"
                                        FontSize="Large"
                                        Text="{Binding Name}" />
                                </StackLayout>
                            </Frame>
                        </Grid>
                    </ViewCell>
                </DataTemplate>
            </renderedViews:HorizontalListView.ItemTemplate>
        </renderedViews:HorizontalListView>
この状態で実行すると,以下のようにアイテムをドラッグアンドドロップで入れ替えることができます.

HorizontalListViewでデータを表示するために最低限必要なプロパティは以下のとおりです.(ItemsSourceは前提として)
もう一つ前提として,このHorizontalListViewは名前のとおり,デフォルトではHorizontalなリストです.
- ColumnCount
- 画面の幅にいくつのアイテムが収まるように表示するかを指定する.なので,少なくとも
1以上が指定されていないと,何も表示されないので注意.
- 画面の幅にいくつのアイテムが収まるように表示するかを指定する.なので,少なくとも
以下はColumnCount="2"の場合

- ItemHeight
- 名前のとおり,アイテムの高さを指定します.これを指定しないと,
ListLayout="Grid"としたときに表示されません.
- 名前のとおり,アイテムの高さを指定します.これを指定しないと,
- ListLayout
- Linear 横1列の表示(デフォルト)
- Carousel 1画面に1アイテム
- Grid 格子状に上から下へ.列数は
ColumnCountで指定. - EnableDragAndDrop ドラッグアンドドロップを有効にする
ところで,縦並びの一般的なListViewのような表示をするにはどうしたらよいかというと,ColumnCount="1",ListLayout="Grid"という設定をすれば以下のようにオーソドックスな見た目になります.

ColumnCount="2",ListLayout="Grid"という設定にすれば,以下のように2列の格子状に表示されます.
もちろん,この状態でドラッグアンドドロップできます.

ドラッグアンドドロップ中の見た目を変える
ここまでで素晴らしく便利なのですが,ViewCellをDraggableViewCellに変更すると,更に便利になります.
このコントロールはアイテムがドラッグアンドドロップ中かを示すIsDragAndDroppingというプロパティを持っているので,それをDataTriggerで拾うことで,ドラッグアンドドロップ中の見た目を変更することができます.
        <renderedViews:HorizontalListView
            ColumnCount="2"
            EnableDragAndDrop="True"
            ItemHeight="160"
            ItemsSource="{Binding People}"
            ListLayout="Grid">
            <renderedViews:HorizontalListView.ItemTemplate>
                <DataTemplate>
                    <renderedViews:DraggableViewCell x:Name="DraggableViewCell" IsDraggable="True">
                        <Grid>
                            <Frame
                                Margin="10,0"
                                BorderColor="Green"
                                HasShadow="True">

                                <Frame.Triggers>
                                    <DataTrigger
                                        Binding="{Binding Source={x:Reference DraggableViewCell}, Path=IsDragAndDropping}"
                                        TargetType="Frame"
                                        Value="True">
                                        <Setter Property="BackgroundColor" Value="LightPink" />
                                        <Setter Property="ScaleX" Value="1.05" />
                                    </DataTrigger>
                                </Frame.Triggers>

                                <StackLayout Orientation="Horizontal">
                                    <Image
                                        Aspect="AspectFill"
                                        Source="{Binding ImageSrc}"
                                        WidthRequest="100" />
                                    <Label
                                        Margin="5"
                                        FontSize="Large"
                                        Text="{Binding Name}" />
                                </StackLayout>
                            </Frame>
                        </Grid>
                    </renderedViews:DraggableViewCell>
                </DataTemplate>
            </renderedViews:HorizontalListView.ItemTemplate>
        </renderedViews:HorizontalListView>

今回のソースコード
listview内のitem内のイベントをbindingで扱う方法
MVVMパターンでアプリケーションを作っている場合,イベントに対する処理をViewModelでCommandを使って定義して,それをバインディングして使う.
ListViewやCollectionView内の各アイテムが選択されたときのCommandをバインディングするときに,以下のように指定するとViewModelのCommandにはバインドされない.
<?xml version="1.0" encoding="utf-8" ?>
<ContentPage
    x:Class="XFCollectionViewCommand.MainPage"
    xmlns="http://xamarin.com/schemas/2014/forms"
    xmlns:x="http://schemas.microsoft.com/winfx/2009/xaml"
    xmlns:d="http://xamarin.com/schemas/2014/forms/design"
    xmlns:local="clr-namespace:XFCollectionViewCommand"
    xmlns:mc="http://schemas.openxmlformats.org/markup-compatibility/2006"
    x:Name="Root"
    mc:Ignorable="d">

    <ContentPage.BindingContext>
        <local:MainPageViewModel />
    </ContentPage.BindingContext>

    <Grid>
        <CollectionView ItemsSource="{Binding People}" SelectionMode="Single">
            <CollectionView.ItemsLayout>
                <LinearItemsLayout Orientation="Vertical" />
            </CollectionView.ItemsLayout>
            <CollectionView.ItemTemplate>
                <DataTemplate>
                    <StackLayout>
                        <StackLayout.GestureRecognizers>
                            <TapGestureRecognizer Command="{Binding TappedCommand}"/>
                        </StackLayout.GestureRecognizers>
                        <Label Text="{Binding .}" />
                    </StackLayout>
                </DataTemplate>
            </CollectionView.ItemTemplate>
        </CollectionView>
    </Grid>

</ContentPage>
これは,ListView内のアイテムにバインドされるのはListViewにバインドされたコレクションの中の1アイテムだから.
CommandはViewModel内に定義されている.
ListViewのアイテムからViewModelのCommandをバインドする方法は2つある.
1つはBindingのSourceでContextPageのBindingContextを参照するようにする.この場合は,ContextPageのx:Nameで名前を設定(ここではx:Name="Root"とした)して,それをReferenceで参照する.
<?xml version="1.0" encoding="utf-8" ?>
<ContentPage
    x:Class="XFCollectionViewCommand.MainPage"
    xmlns="http://xamarin.com/schemas/2014/forms"
    xmlns:x="http://schemas.microsoft.com/winfx/2009/xaml"
    xmlns:d="http://xamarin.com/schemas/2014/forms/design"
    xmlns:local="clr-namespace:XFCollectionViewCommand"
    xmlns:mc="http://schemas.openxmlformats.org/markup-compatibility/2006"
    x:Name="Root"
    mc:Ignorable="d">

    <ContentPage.BindingContext>
        <local:MainPageViewModel />
    </ContentPage.BindingContext>

    <Grid>
        <CollectionView ItemsSource="{Binding People}" SelectionMode="Single">
            <CollectionView.ItemsLayout>
                <LinearItemsLayout Orientation="Vertical" />
            </CollectionView.ItemsLayout>
            <CollectionView.ItemTemplate>
                <DataTemplate>
                    <StackLayout>
                        <StackLayout.GestureRecognizers>
                            <TapGestureRecognizer Command="{Binding Path=BindingContext.TappedCommand, Source={Reference Root}}" />
                        </StackLayout.GestureRecognizers>
                        <Label Text="{Binding .}" />
                    </StackLayout>
                </DataTemplate>
            </CollectionView.ItemTemplate>
        </CollectionView>
    </Grid>

</ContentPage>
    class MainPageViewModel
    {
        public List<string> People { get; set; }
        public MainPageViewModel()
        {
            People = new List<string>();
            People.AddRange(new[]
            {
                "person1",
                "person2",
                "person3",
                "person4",
            });

            TappedCommand = new Command(OnTapped);
        }

        private void OnTapped(object obj)
        {
            //タップされたときの処理
        }

        public Command TappedCommand { get; }
    }
Xamarin.Forms 4.3以降であれば,RelativeSourceを使える.
                        <StackLayout.GestureRecognizers>
                            <!--<TapGestureRecognizer Command="{Binding Path=BindingContext.TappedCommand, Source={Reference Root}}" />-->
                            <TapGestureRecognizer Command="{Binding Source={RelativeSource AncestorType={x:Type local:MainPageViewModel}}, Path=TappedCommand}" />
                        </StackLayout.GestureRecognizers>
なるほど.
ソースコード
Visual Studioでフォントを変更する
デフォルトではこのようなフォント.

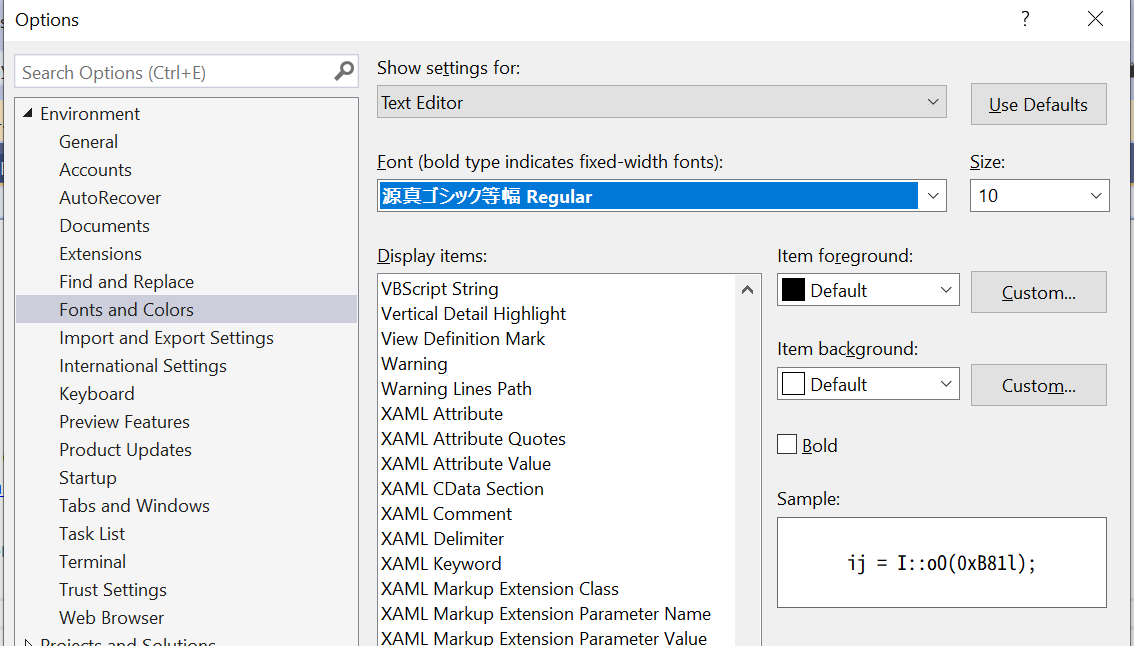
どこかで「源真ゴシック等幅 Regular」がいい,というような話を聞いて,それをインストールした.
Visual StudioのメニューからTools > Optionsを選択して,Optionsダイアログを開きます.
オプションの一覧からEnvironment(環境) > Fonts and Colors(フォントおよび色)を選択します.

一番上のShow settings forの項目でText Editorを選択します.

Fontを選択します.

Xamarin.FormsでStyleを指定,使用する
コントロールに個別に背景色や文字の大きさ,サイズなど様々な見た目の指定をすることができる.
        <Label
            BackgroundColor="LightBlue"
            FontSize="Large"
            HorizontalOptions="CenterAndExpand"
            Text="Label1"
            TextColor="LightPink"
            VerticalOptions="CenterAndExpand" />
しかし,すべてのコントロールにこのような見た目を指定するのは大変手間がかかり,統一することが難しい.
それらの見た目(Style)を一度記述しておき,それを使い回すことができる.
StyleはResourceDictionaryに記述する.
例えば,ContentPage内のすべてのLabelを同じ見た目にしたい場合は以下のようにする.
<?xml version="1.0" encoding="utf-8" ?>
<ContentPage
    x:Class="XFStylePractice.MainPage"
    xmlns="http://xamarin.com/schemas/2014/forms"
    xmlns:x="http://schemas.microsoft.com/winfx/2009/xaml"
    xmlns:d="http://xamarin.com/schemas/2014/forms/design"
    xmlns:mc="http://schemas.openxmlformats.org/markup-compatibility/2006"
    mc:Ignorable="d">

    <ContentPage.Resources>
        <ResourceDictionary>
            <Style TargetType="Label">
                <Setter Property="BackgroundColor" Value="LightBlue" />
                <Setter Property="FontSize" Value="Large" />
                <Setter Property="HorizontalOptions" Value="CenterAndExpand" />
                <Setter Property="VerticalOptions" Value="CenterAndExpand" />
                <Setter Property="TextColor" Value="LightPink" />
            </Style>

        <Label Text="Label1" />
        <Label Text="Label2" />
        <Label Text="Label3" />
        <Label Text="Label4" />
        <Label Text="Label5" />
    </StackLayout>

</ContentPage>
このように見た目の定義は一箇所だけで,Labelの見た目を統一できる.

見た目を変更するときも,一箇所だけで済む.
Styleに名前をつけて利用する
上の例ではコントロール(LabelとかButtonとか)単位で一括で見た目を指定したけれど,例えばLabelでも見出しで使われる場合と,本文で使われる場合ではStyleが異なるので,コントロール一括指定では困る.
このような場合,Styleの定義に名前をつけて,コントロール側ではその名前を使ってスタイルを適用することができる.
Style要素にx:Keyを使って名前(ここではlabelStyleとつけた)をつけ,Label側で以下のように指定する.
<Label Text="Label1" Style="{StaticResource labelStyle}" />
以下のようにするとStyleを指定したLabelだけ見た目が変わる.
<?xml version="1.0" encoding="utf-8" ?>
<ContentPage
    x:Class="XFStylePractice.MainPage"
    xmlns="http://xamarin.com/schemas/2014/forms"
    xmlns:x="http://schemas.microsoft.com/winfx/2009/xaml"
    xmlns:d="http://xamarin.com/schemas/2014/forms/design"
    xmlns:mc="http://schemas.openxmlformats.org/markup-compatibility/2006"
    mc:Ignorable="d">

    <ContentPage.Resources>
        <ResourceDictionary>
            <Style x:Key="labelStyle" TargetType="Label">
                <Setter Property="BackgroundColor" Value="LightBlue" />
                <Setter Property="FontSize" Value="Large" />
                <Setter Property="HorizontalOptions" Value="CenterAndExpand" />
                <Setter Property="VerticalOptions" Value="CenterAndExpand" />
                <Setter Property="TextColor" Value="LightPink" />
            </Style>
        </ResourceDictionary>
    </ContentPage.Resources>

    <StackLayout>

        <Label Text="Label1" Style="{StaticResource labelStyle}" />
        <Label Text="Label2" />
        <Label Text="Label3" />
        <Label Text="Label4" />
        <Label Text="Label5" />
    </StackLayout>

</ContentPage>

Styleのスコープ
Styleはそれを定義した要素の内側で有効です.
また,以下のようにContentPageでの定義さて,そのContentPageの中のStackLayoutでも定義されるといったStyleが入れ子になっている場合,内側のStyleが適用されます.
<?xml version="1.0" encoding="utf-8" ?>
<ContentPage
    x:Class="XFStylePractice.MainPage"
    xmlns="http://xamarin.com/schemas/2014/forms"
    xmlns:x="http://schemas.microsoft.com/winfx/2009/xaml"
    xmlns:d="http://xamarin.com/schemas/2014/forms/design"
    xmlns:mc="http://schemas.openxmlformats.org/markup-compatibility/2006"
    mc:Ignorable="d">

    <ContentPage.Resources>
        <ResourceDictionary>
            <Style TargetType="Label">
                <Setter Property="BackgroundColor" Value="LightBlue" />
                <Setter Property="FontSize" Value="Large" />
                <Setter Property="HorizontalOptions" Value="CenterAndExpand" />
                <Setter Property="VerticalOptions" Value="CenterAndExpand" />
                <Setter Property="TextColor" Value="LightPink" />
            </Style>
        </ResourceDictionary>
    </ContentPage.Resources>

    <StackLayout>
        <StackLayout.Resources>
            <ResourceDictionary>
                <Style TargetType="Label">
                    <Setter Property="BackgroundColor" Value="Yellow" />
                    <Setter Property="HorizontalOptions" Value="CenterAndExpand" />
                    <Setter Property="VerticalOptions" Value="CenterAndExpand" />
                    <Setter Property="TextColor" Value="Red" />
                </Style>
            </ResourceDictionary>
        </StackLayout.Resources>

        <Label Text="Label1" />
        <Label Text="Label2" />
        <Label Text="Label3" />
        <Label Text="Label4" />
        <Label Text="Label5" />
    </StackLayout>

</ContentPage>

ソースコード
Xamarin.Formsで共有プロジェクトに置いたフォントを使う
Xamarin.Forms 4.5からEmbedded Fontsというプレビュー版の機能があって,これはどういうものかというと,これまでフォントを追加する場合は各プラットフォームのプロジェクト内にフォントファイルを配置する必要がありましたが,フォントファイルを共有プロジェクト内に1つ置くだけで使える,というものです.
これまではAndroidで正しく動かない場合があったりもしましたが,Xamarin.Forms 4.5.0.530では解消されています.
利用手順
手順は以下のとおりです.
- フォントを入手する.
- フォントファイルを共有プロジェクト内に置く.
- フォントファイルのビルドアクションを
Embedded Resourceにする. - AssemblyInfo.csに使用するフォントを記述する.
- 追記:AssemblyInfo.csでなくてもよい.
- 例えばApp.xaml.csでも良いようだ.
[assembly: ExportFont("Lato-Black.ttf", Alias = "LatoBlack")]
[assembly: ExportFont("Lato-Bold.ttf", Alias = "LatoBold")]
[assembly: ExportFont("Lato-Regular.ttf", Alias = "LatoRegular")]
[assembly: ExportFont("fa-regular.otf", Alias = "FontAwesomeRegular")]
[assembly: ExportFont("fa-solid.otf", Alias = "FontAwesomeSolid")]

namespace TravelMonkey
{
    public partial class App : Application
    {
フォントの入手
ttf(またはotf?試していない)ファイルを入手します. 入手先は参考までに↓. shuhelohelo.hatenablog.com
フォントファイルを共有プロジェクト内に置く
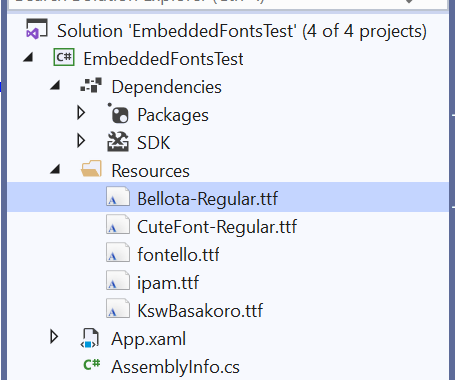
ソリューションエクスプローラで,共有プロジェクト内にドラッグアンドドロップすればOKです.

上のように適当なフォルダを作成してその中にフォントファイルを配置するのは自由ですが, プログラム的には特に意味は持ちません.

ファイルの置き場所については,公式ドキュメントにもあるように,任意のフォルダでよいとのことです.

フォントは、共有プロジェクト内の任意のフォルダーに置くことができます。フォントをアセンブリに登録するときにフォルダー名を指定する必要はありません。
利用する上でもフォルダを指定することはなく,フォントファイル名を指定するだけなので,開発者が管理がしやすいぐらいのメリットです.
フォントファイルのビルドアクションをEmbedded Resourceにする
ソリューションエクスプローラで,フォントファイルを右クリックしてコンテキストメニューからプロパティを選択します.
そして,ビルドアクションをEmbedded Resourceにします.

AssemblyInfo.csに使用するフォントを記述する
共有プロジェクト内にAssemblyInfo.csというファイルがあるので,その中に以下のように使用するフォントについて記述します.
[assembly: ExportFont("Bellota-Regular.ttf")]
または別名をつけることもできます.
[assembly: ExportFont("Bellota-Regular.ttf",Alias ="Bellota")]
配置したフォルダは関係ありません.
Embedded Resourceに設定したことで,プロジェクトファイルにフォントファイルのパスが登録されるからです.

利用する
利用するときは以下のようにFontFamilyにフォントファイル名を指定します.
または,AssemblyInfo.csで別名を指定した場合は,その別名を指定します.
        <Label
            FontFamily="Bellota-Regular"
            HorizontalOptions="CenterAndExpand"
            Text="Hello Embedded Fonts"
            VerticalOptions="CenterAndExpand" />
