ResourceDictionaryを単独のファイルに切り分ける
ButtonやLabelを始めとする様々な見た目を指定するためにResourceDictionaryを使います.例えば以下のように.
    <ContentPage.Resources>
        <ResourceDictionary>
            <Style TargetType="Entry">
                <Setter Property="PlaceholderColor" Value="Red" />
            </Style>
        </ResourceDictionary>
    </ContentPage.Resources>
これが定義されたContentPage内のすべてのEntryにこの指定が適用され,プレースホルダーの色が赤になります.
もしApp.xamlのApplication要素のResourceDictionaryに定義すれば,アプリケーション全体に対してこの指定が適用されます.
<?xml version="1.0" encoding="utf-8" ?>
<Application
    x:Class="XFSeparatedDataTemplate.App"
    xmlns="http://xamarin.com/schemas/2014/forms"
    xmlns:x="http://schemas.microsoft.com/winfx/2009/xaml"
    xmlns:d="http://xamarin.com/schemas/2014/forms/design"
    xmlns:local="clr-namespace:XFSeparatedDataTemplate.Models"
    xmlns:mc="http://schemas.openxmlformats.org/markup-compatibility/2006"
    mc:Ignorable="d">
    <Application.Resources>
        <ResourceDictionary>
            <Style TargetType="Entry">
                <Setter Property="PlaceholderColor" Value="Red" />
            </Style>
        </ResourceDictionary>
    </ContentPage.Resources>
    </Application.Resources>
</Application>
ResourceDictionaryはContentPageなりUIコントロール内なり,Application内なり必要な場所に定義すれば良いですが,もしかしたらResourceDictionaryを単独のファイルに切り分けてまとめて定義しておきたいこともあるかもしれません.
そのような場合は冒頭の公式ページの説明のとおりにResourceDictionary専用のファイルを作ります.
Xamlファイルを作成する
ResourceDictionaryを記述するだけのファイルを用意するのですが,雛形としては以下の内容が書いてあれば何でも構いません.
<?xml version="1.0" encoding="utf-8" ?>
<?xaml-comp compile="true"?>
<ResourceDictionary xmlns="http://xamarin.com/schemas/2014/forms" xmlns:x="http://schemas.microsoft.com/winfx/2009/xaml">

</ResourceDictionary>
ここではMyResourceDictionary.xamlとしてResourcesフォルダ内に作成しました.

これで準備完了です.
試してみる
先程のEntryのStyleの指定をMyResourceDictionary.xaml内に追加します.
<?xml version="1.0" encoding="utf-8" ?>
<?xaml-comp compile="true"?>
<ResourceDictionary xmlns="http://xamarin.com/schemas/2014/forms" xmlns:x="http://schemas.microsoft.com/winfx/2009/xaml">
    <Style TargetType="Entry">
        <Setter Property="PlaceholderColor" Value="Red" />
    </Style>
</ResourceDictionary>
これを利用するContentPageはこんな感じです.
<?xml version="1.0" encoding="utf-8" ?>
<ContentPage
    x:Class="XFSeparatedDataTemplate.MainPage"
    xmlns="http://xamarin.com/schemas/2014/forms"
    xmlns:x="http://schemas.microsoft.com/winfx/2009/xaml"
    xmlns:d="http://xamarin.com/schemas/2014/forms/design"
    xmlns:mc="http://schemas.openxmlformats.org/markup-compatibility/2006"
    mc:Ignorable="d">

    <ContentPage.Resources>
        <ResourceDictionary Source="Resources/MyResourceDictionary.xaml" />
    </ContentPage.Resources>
    <Entry
            HorizontalOptions="CenterAndExpand"
            Placeholder="UserName2"
            VerticalOptions="CenterAndExpand" />
</ContentPage>
ContentPage.Resources要素の中で<ResourceDictionary Source="Resources/MyResourceDictionary.xaml" />というように先程作成したResourceDictionaryのファイルのパスを指定します.
これで,指定したResourceDictionaryの内容がこのContentPage内で有効になります.
それではこのContentPageを表示してみましょう.

Styleが適用されてプレースホルダーが赤くなっています.
複数のファイルを読み込む
複数のResourceDictionary用ファイルを作成し,例えば1つのContentPageで複数読み込む場合は以下のようにできます.
    <ContentPage.Resources>
        <ResourceDictionary Source="Resources/MyResourceDictionary.xaml" />
        <ResourceDictionary Source="Resources/BookListTemplate.xaml" />
    </ContentPage.Resources>
便利です.
おまけ
デザイン時の仮データをXamlに記述することができ,実行しなくてもプレビューアでUIを確認することができます.
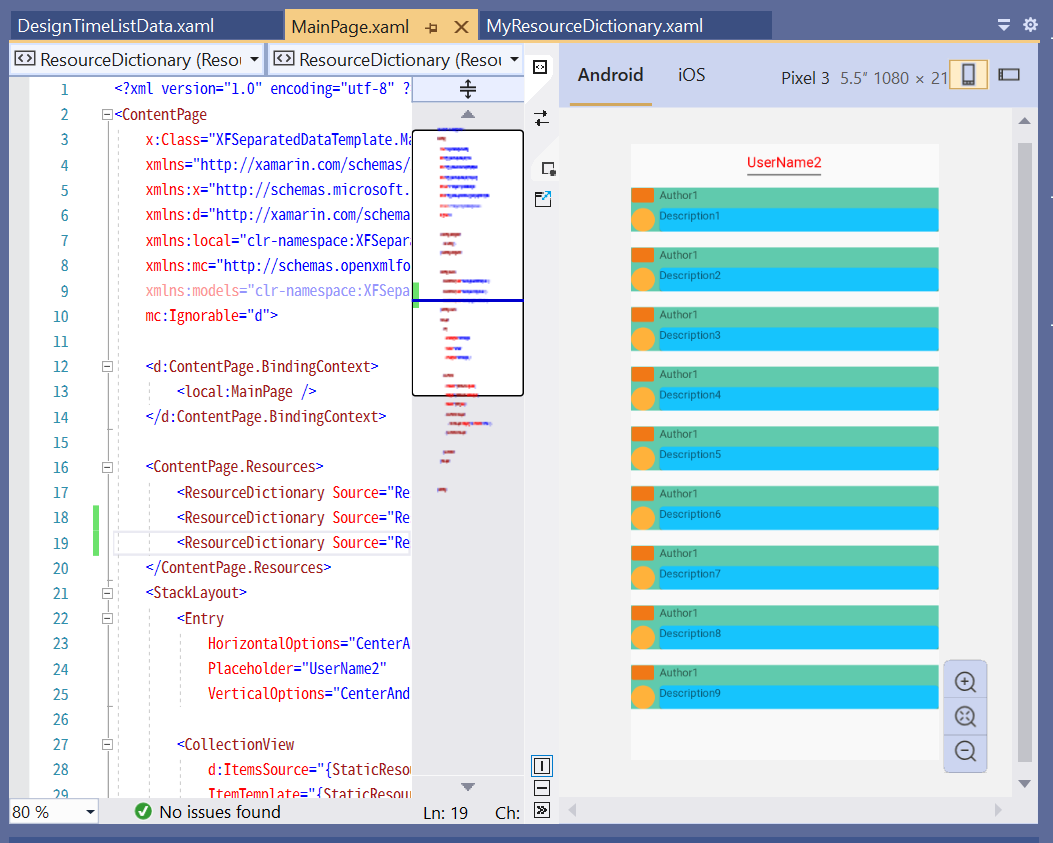
ListViewやCollectionViewなどのリスト系のItemsSourceにもこのようなプレビュー用のデータを用意でき,プレビューアで以下のように表示できます.

このプレビューア用データを例えばCollectionView内に以下のように記述すると,
        <CollectionView ItemTemplate="{StaticResource BookDataTemplate}" ItemsSource="{Binding Books}">
            <CollectionView.ItemsLayout>
                <LinearItemsLayout ItemSpacing="20" Orientation="Vertical" />
            </CollectionView.ItemsLayout>
            <d:CollectionView.ItemsSource>
                <x:Array Type="{x:Type models:Book}">
                    <models:Book
                        Title="Title1"
                        AuthorName="Author1"
                        Description="Description1" />
                    <models:Book
                        Title="Title2"
                        AuthorName="Author1"
                        Description="Description2" />
                    <models:Book
                        Title="Title3"
                        AuthorName="Author1"
                        Description="Description3" />
                    <models:Book
                        Title="Title4"
                        AuthorName="Author1"
                        Description="Description4" />
                    <models:Book
                        Title="Title5"
                        AuthorName="Author1"
                        Description="Description5" />
                    <models:Book
                        Title="Title6"
                        AuthorName="Author1"
                        Description="Description6" />
                    <models:Book
                        Title="Title7"
                        AuthorName="Author1"
                        Description="Description7" />
                    <models:Book
                        Title="Title8"
                        AuthorName="Author1"
                        Description="Description8" />
                    <models:Book
                        Title="Title9"
                        AuthorName="Author1"
                        Description="Description9" />
                </x:Array>
            </d:CollectionView.ItemsSource>
        </CollectionView>
このようになり,折りたたんでおけばよいとは言っても邪魔になります.
このようなプレビュー用のデータもResourceDictionaryに分離することでコードをスッキリさせることができます.
この<x:Array>...</Array>をまるごと以下のようにResourceDictionary専用ファイルに移します.
<?xml version="1.0" encoding="utf-8" ?>
<?xaml-comp compile="true"?>
<ResourceDictionary
    xmlns="http://xamarin.com/schemas/2014/forms"
    xmlns:x="http://schemas.microsoft.com/winfx/2009/xaml"
    xmlns:models="clr-namespace:XFSeparatedDataTemplate.Models">
    <x:Array x:Key="SampleData" Type="{x:Type models:Book}">
        <models:Book
            Title="Title1"
            AuthorName="Author1"
            Description="Description1" />
        <models:Book
            Title="Title2"
            AuthorName="Author1"
            Description="Description2" />
        <models:Book
            Title="Title3"
            AuthorName="Author1"
            Description="Description3" />
        <models:Book
            Title="Title4"
            AuthorName="Author1"
            Description="Description4" />
        <models:Book
            Title="Title5"
            AuthorName="Author1"
            Description="Description5" />
        <models:Book
            Title="Title6"
            AuthorName="Author1"
            Description="Description6" />
        <models:Book
            Title="Title7"
            AuthorName="Author1"
            Description="Description7" />
        <models:Book
            Title="Title8"
            AuthorName="Author1"
            Description="Description8" />
        <models:Book
            Title="Title9"
            AuthorName="Author1"
            Description="Description9" />
    </x:Array>
</ResourceDictionary>
x:Array要素にはx:Key="SampleData"を追加しておきます.
こうすると,先程のCollectionViewは以下のように必要最低限のスッキリした記述で,プレビューアにもリストを表示させることができます.
        <CollectionView
            d:ItemsSource="{StaticResource SampleData}"
            ItemTemplate="{StaticResource BookDataTemplate}"
            ItemsSource="{Binding Books}">
            <CollectionView.ItemsLayout>
                <LinearItemsLayout ItemSpacing="20" Orientation="Vertical" />
            </CollectionView.ItemsLayout>
        </CollectionView>