Xamarin.FormsでLight Theme, Dark Themeに応じてスタイルを切り替える
Experimentalですが,OSのLightテーマ,Darkテーマの切り替えに応じてUIの見た目を切り替える仕組みが提供されています.
それがOnAppThemeマークアップ拡張です.
以下のように記述することで,OSのLightテーマ,Darkテーマに応じて,それぞれに指定した値が適用されます.
        <Label
            HorizontalOptions="CenterAndExpand"
            Text="インラインで指定"
            TextColor="{OnAppTheme Light=Green,
                                   Dark=Red}"
            VerticalOptions="CenterAndExpand" />
または,StyleとしてResourceDictionaryに登録して使用することもできます.ただし,Styleを使用する場合はDynamicResourceとして使用する必要があるので注意が必要です.
        <Style x:Key="labelStyle" TargetType="Label">
            <Setter Property="TextColor" Value="{OnAppTheme Black, Light=Blue, Dark=Teal}" />
            <Setter Property="BackgroundColor" Value="{OnAppTheme Light='#00FFFF', Dark='#999999'}" />
        </Style>
        <Label
            HorizontalOptions="CenterAndExpand"
            Style="{DynamicResource labelStyle}"
            Text="Styleで指定(DynamicResourceを使う)"
            VerticalOptions="CenterAndExpand" />
現時点ではExperimentalのため,OnAppThemeを使用するためにはDevice.SetFlags()メソッドがアプリケーション開始時に実行されるようにする必要があります.
App.xaml.csのコンストラクタに追加すると良いでしょう.
        public App()
        {
            //ここ
            Device.SetFlags(new List<string> {
                "AppTheme_Experimental"
            });

            InitializeComponent();

            MainPage = new MainPage();
        }
サンプルコードはこちら
Xamarin.FormsのDynamicResource
アプリケーション内で使用する値やStyleなどをResourceDictionaryに定義しておき,StaticResourceとして使用することはよくあります.
<Color x:Key="PrimaryColor">#547799</Color>

...

<Label TextColor="{StaticResource PrimaryColor}"/>
このResourceの値はプログラム中で変更することができます.
App.Current.Resources["PrimaryColor"] = Color.Orange;
//もしくはHexコードでもOk.
App.Current.Resources["PrimaryColor"] = "#00FF00";
さて,StaticResourceとして使用した場合,プログラム中でResourceの値を変更しても,UIに変更は生じません.上の例で言えば,Labelの文字色はオレンジ色にはなりません.
プログラムによって動的に値を変更して,その変更がUIをに反映されるようにするにはStaticResourceではなくDynamicResourceを使います.
<Label TextColor="{DynamicResource PrimaryColor}"/>
データバインディングと同じように変更が反映されます.
上でやった実行時のResourceの書き換えですが,以下のように他のResourceを指定することも可能です.こちらの使い方のほうが一般的かと思います.
App.Current.Resources["PrimaryColor"] = App.Current.Resource["SecondColor"];
例えば,App.xamlなどで以下のようにリソースを定義しておいて,上のように利用します.
<Setter Property="BackgroundColor" Value="{DynamicResource PrimaryColor}" />
サンプルコードはこちら.
Xamarin.FormsからCognitive ServiceのComputer Visionを使う
今回やりたいのは,カメラで撮影した画像からテキストを抽出するもの.
参考は,
アプリ内でカメラを使って,撮影し,画像データを取得するには.
MontemagnoさんのMediaPluginを使っている.
カメラの使い方(Android)
カメラを使って画像を取得するためにはXam.Plugin.Mediaというパッケージを使います.
セットアップの手順は公式サイトのとおりに行えば問題ありません.
このパッケージはカメラからの画像取得だけでなく,フォルダ内の画像を選択することもできます.
Xam.Plugin.Mediaをインストール
Xam.Plugin.MediaをNugetでインストールする.
AndroidManifest.xmlを編集
AndroidManifest.xmlを以下のように編集する.
<?xml version="1.0" encoding="utf-8"?>
<manifest xmlns:android="http://schemas.android.com/apk/res/android" android:versionCode="1" android:versionName="1.0" package="com.companyname.xfazuretextrecognization" android:installLocation="auto">
  <uses-sdk android:minSdkVersion="21" android:targetSdkVersion="28" />

  <application android:label="XFAzureTextRecognization.Android">

    <!--ここから-->
    <provider android:name="android.support.v4.content.FileProvider"
          android:authorities="${applicationId}.fileprovider"
          android:exported="false"
          android:grantUriPermissions="true">

      <meta-data android:name="android.support.FILE_PROVIDER_PATHS"
                       android:resource="@xml/file_paths"></meta-data>
    </provider>
    <!--ここまで-->

  </application>

  <uses-permission android:name="android.permission.ACCESS_NETWORK_STATE" />
  <uses-permission android:name="android.permission.READ_EXTERNAL_STORAGE" />
  <uses-permission android:name="android.permission.WRITE_EXTERNAL_STORAGE" />
</manifest>
file_paths.xmlを追加
Resourcesフォルダの下にxmlフォルダを作成し,そこにfile_paths.xml`を追加します.

file_paths.xmlには以下の内容を記述します.
<?xml version="1.0" encoding="utf-8"?>
<paths xmlns:android="http://schemas.android.com/apk/res/android">
  <external-files-path name="my_images" path="Pictures" />
  <external-files-path name="my_movies" path="Movies" />
</paths>
使う
ボタンのイベントハンドラなどの中で以下のように記述します.
var photo = await CrossMedia.Current.TakePhotoAsync(new StoreCameraMediaOptions { PhotoSize = PhotoSize.Small });

//撮影画面から戻るボタンなどで戻った場合にはnullになるのでチェックする
if (_photo is null)
    return;
処理がこの行に達した時点で以下のようにカメラが起動します.

カメラを初めて使用するときに許可を求められるのでそれでもOkですが,コードで以下のようにカメラの有無や許可の有無などのチェック及び許可のリクエストなどを行うとよいでしょう.
            //カメラの有無と撮影の許可の有無をチェック
            if (!CrossMedia.Current.IsCameraAvailable || !CrossMedia.Current.IsTakePhotoSupported)
            {
                await DisplayAlert("No Camera", ":( No camera available.", "OK");
                return;
            }
            //カメラ利用許可の有無を確認
            if (await Permissions.CheckStatusAsync<Permissions.Camera>() != PermissionStatus.Granted)
            {
                //カメラ利用許可をリクエスト
                if(await Permissions.RequestAsync<Permissions.Camera>()!=PermissionStatus.Granted)
                {
                    return;
                }
            }
AzureでComputer Visionのインスタンスを作成
こちらの説明のとおりに作成します.
まずリソースグループを作成します.
az group create -l westus2 -g YOUR-RESOURCE-GROUP-NAME-GOES-HERE
次にComputer Visionのインスタンスを作ります.
az cognitiveservices account create \
--kind ComputerVision \
--location westus2 \
--sku F0 \
--resource-group RESOURCE-GROUP-NAME-FROM-FIRST-STEP \
--name YOUR-SERVICE-NAME-GOES-HERE
最後にAPIキーとエンドポイントをメモしておきます.

Microsoft.Azure.CognitiveServices.Vision.ComputerVisionをインストール
Nugetからインストールします.
使い方
ComputerVisionClientのインスタンスを作成します.
        private readonly ComputerVisionClient _computerVisionClient = new ComputerVisionClient(new ApiKeyServiceClientCredentials({COMPUTER-VISION-APIKEY}))
        {
            Endpoint = {COMPUTER-VISION-ENDPOINT}
        };
CoumputerVisionClientクラスにはComuputer Visionを使うための様々なクラスが用意されています.
今回は画像内の文字を抽出するのでRecognizePrintedTextInStreamAsyncメソッドを使います.
var result = await _computerVisionClient.RecognizePrintedTextInStreamAsync(detectOrientation: true, image: pictureStream);
得られる結果はOcrResultオブジェクトで,以下のJSONと同じ構造になっています.
このように,テキストだけでなく,画像上のテキストの位置も取得できます.
実際に使ってみる
以下のように写真を撮影して「✔」ボタンを押すと,

テキストの抽出結果が表示される,

という簡単なアプリを作成.
ソースコードは以下.
Xamarin.Google.Android.Material Version="1.0.0-rc1"を導入したときのEntryなどの挙動の違い
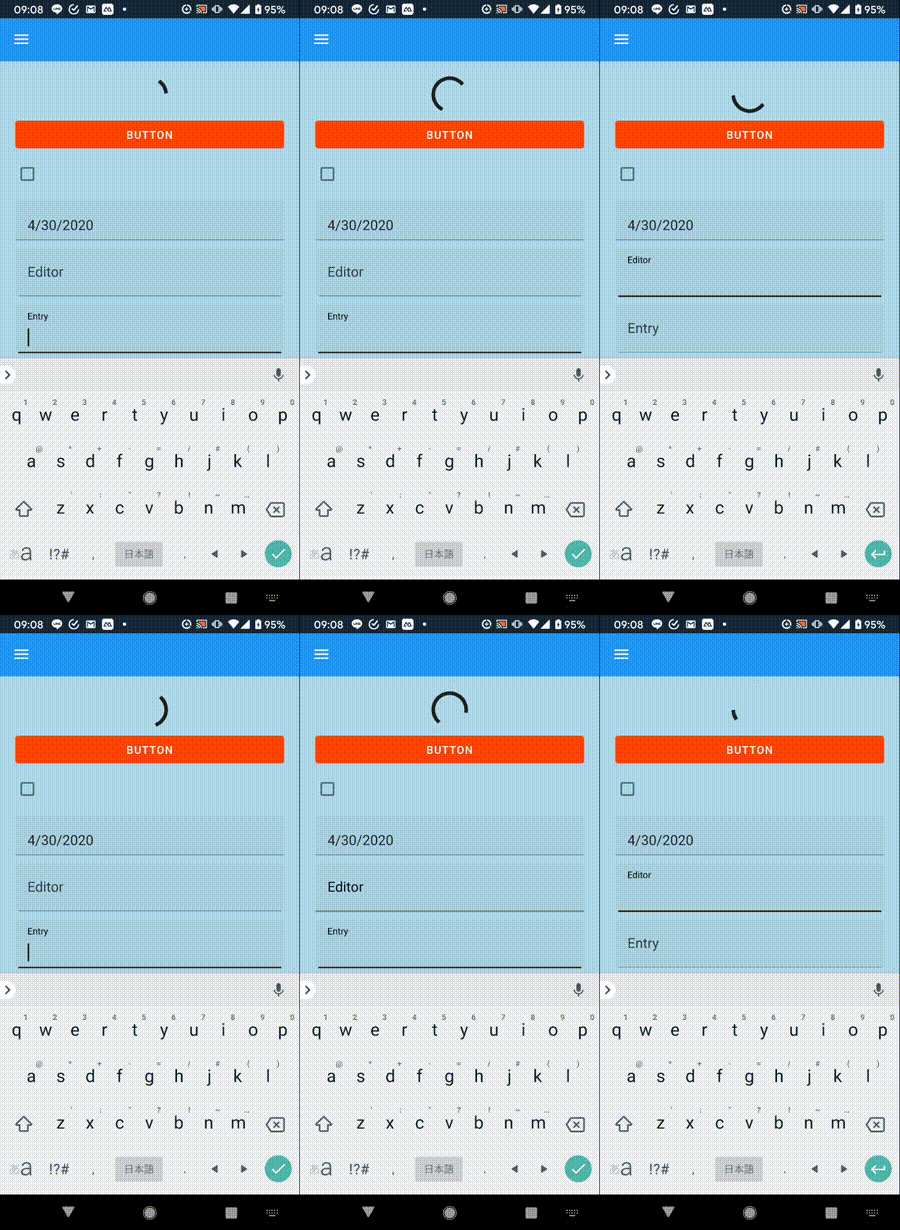
以下のサンプルアプリを実行したとき,Entryの見た目と挙動が違っていたので,どういう仕組なのか色々調べた結果.
どんな挙動かというと以下のとおり.

Entryに背景色がついていて,focusが当たると色が変わる.
これはVisual="Material"としただけでは得られない挙動.
Visual="Material"を指定したときの挙動はこう.

Visual="Material"を指定しただけでは,focus時に背景色は変わらないし,focus時の背景色を指定するプロパティだってない.
カスタムレンダラーとかEffectとかVisualStateManagerとか,またはサードパーティのUIライブラリを使っているのかな,と思ったら使っていなかった.
                <Entry
                    Grid.Row="1"
                    Grid.Column="1"
                    Keyboard="Text"
                    Placeholder="First name"
                    Style="{DynamicResource EntryStyle}"
                    Text="{Binding FirstName}" />
素のEntryだったし,Styleに指定しているEntryStyleにひみつがあるのかと思いきやこれまた特別なことはしていない.
            <Style x:Key="EntryStyle" TargetType="Entry">
                <Setter Property="Visual" Value="Material" />
                <Setter Property="BackgroundColor" Value="{DynamicResource EntryBackgroundColor}" />
                <Setter Property="TextColor" Value="{DynamicResource SystemGray}" />
                <Setter Property="PlaceholderColor" Value="{DynamicResource AccentColor}"/>
            </Style>
しかも,Entryに限らずDatePickerやTimePickerなど基本的な入力系のUIは同じ挙動になっている.
結論としてはこの挙動はXamarin.Google.Android.MaterialというパッケージをAndroidプロジェクトにインストールしていることによるものだった.バージョンは1.1.0-rc2.安定版の1.0.0ではいつもどおり.

これがインストールされているとUIの挙動が前述のとおりになる.
選択中のEntryがわかりやすいから,いいなと思うけれど,プレースホルダーが見えなくなってしまうのが困る.
これはまだ安定版じゃないから挙動がおかしいのか,それとも正しいのかわからない.
インストール
AndroidプロジェクトのReferencesで右クリックしてManage Nuget Packagesを選択する.

Xamarin.Google.Android.Materialを検索して,バージョン1.1.0-rc1以上を選択してインストールする.

そしてビルドすると以下のパッケージをインストールしろと言われるので,
- Xamarin.AndroidX.Lifecycle.LiveData
- Xamarin.AndroidX.Browser
- Xamarin.AndroidX.Legacy.Supportv4
AndroidプロジェクトにNugetでインストールするか,Androidプロジェクトの.csprojファイルに以下のように追記する.
    <PackageReference Include="Xamarin.AndroidX.Lifecycle.LiveData" Version="2.2.0" />
    <PackageReference Include="Xamarin.AndroidX.Browser" Version="1.2.0" />
    <PackageReference Include="Xamarin.AndroidX.Legacy.Support.V4" Version="1.0.0" />
参照
Xamarin.Google.Android.Materialに関しては以下のページに説明されているようだけれど,しっかり読んでいない.AndroidX絡みのようだ.
Xamarin.Forms.Visual.Materialでコントロールの見た目を変更する
iOSとAndroidで可能な限り同じマテリアルデザインの見た目に統一することができる.
これまではそれぞれネイティブのコントロールをそのまま使っていたところを,見た目を統一できる,かつデザインを新し目のものにできる,というところかな.
Xamarin.Forms.Visual.MaterialをNugetでインストールする.

次に,Android,iOSの各プロジェクトにそれぞれ以下を追記します.
Android
MainActivity.csで,global::Xamarin.Forms.Forms.Init(this, savedInstanceState);の下に次の1行を追加します.
global::Xamarin.Forms.FormsMaterial.Init(this, savedInstanceState);
iOS
iOS側ではAppDelegate.csで同じくglobal::Xamarin.Forms.Forms.Init();の下に以下の1行を追加します.
global::Xamarin.Forms.FormsMaterial.Init();
デフォルトとマテリアルの切り替え
ContentPageのVisualプロパティにDefaultまたはMaterialを指定することで切り替えることができます.
<ContentPage
    Visual="Material"
...
>
デザイン適用対象となるコントロール
- ActivityIndicator
- Button
- CheckBox
- DatePicker
- Editor
- Entry
- Frame
- Picker
- ProgressBar
- Slider
- Stepper
- TimePicker
見た目の比較
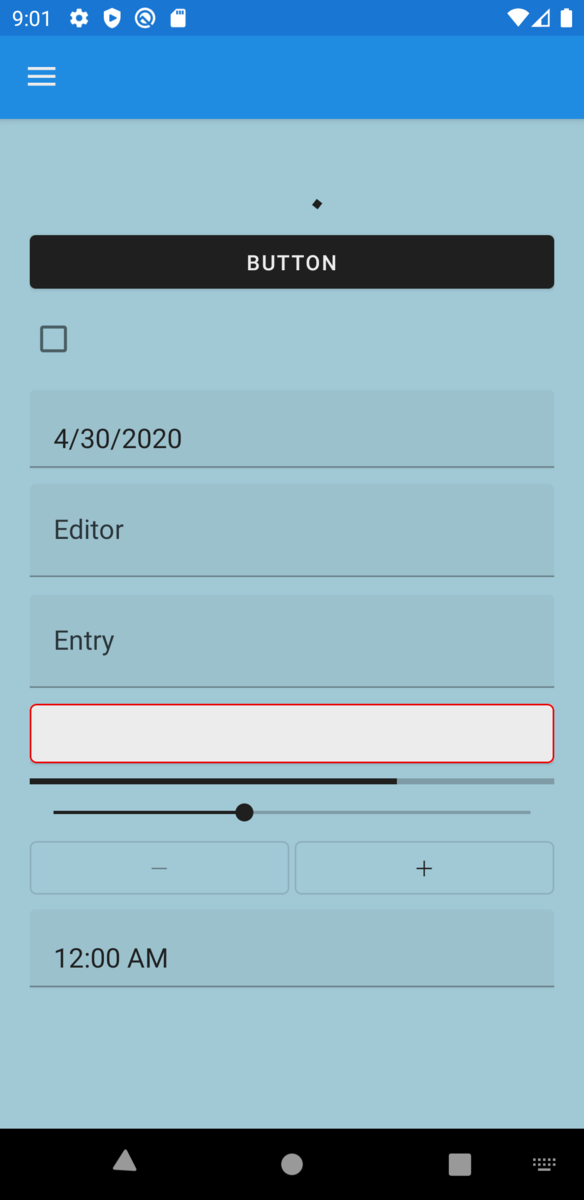
見た目はDefaultとMaterialで以下のような違いがあります.
色の指定はしていないほぼデフォルトでの違いです.
Visual="Default"の場合

Visual="Material"の場合

相違点
比較的大きな違いは以下の点です
- Buttonに影が付き,若干立体的になった(Frameと同じぐらいかな)
- Editor,Entry,PickerなどPlaceholderを持つコントロールの場合,フォーカス時にPlaceholderが左上にアニメーションで退避する
 ↓フォーカス

- 入力欄の見た目が変わった
 ↓
↓

入力欄の見た目やプレースホルダーのアニメーションは好ましいと思った.
ShellのFlyoutのメニューの見た目を変更する.
FlyoutItemの各アイテムの背景色,フォントカラーなどを変更したい場合は以下のような定義をShell.Resources内に定義する.
        <Style
            ApplyToDerivedTypes="True"
            Class="FlyoutItemLayoutStyle"
            TargetType="Layout">
            <Setter Property="HeightRequest" Value="44" />
            <Setter TargetName="FlyoutItemLabel" Property="Label.FontSize" Value="16" />
            <Setter TargetName="FlyoutItemLabel" Property="Label.TextColor" Value="Blue" />
            <Setter TargetName="FlyoutItemLabel" Property="Label.HeightRequest" Value="44" />
            <Setter Property="VisualStateManager.VisualStateGroups">
                <VisualStateGroupList>
                    <VisualStateGroup x:Name="CommonStates">
                        <VisualState x:Name="Normal">
                            <VisualState.Setters>
                            </VisualState.Setters>
                        </VisualState>
                        <VisualState x:Name="Selected">
                            <VisualState.Setters>
                                <Setter Property="BackgroundColor" Value="#FF3300" />
                                <Setter TargetName="FlyoutItemLabel" Property="Label.TextColor" Value="White" />
                            </VisualState.Setters>
                        </VisualState>
                    </VisualStateGroup>
                </VisualStateGroupList>
            </Setter>
        </Style>
ShellのFlyoutItemには以下の記事にあるようにText部分,Icon部分,それらを包むContainerがあり,それぞれにStyleClassが予め決められている.
| Flyout Item Part | Style Class Name | Element Name |
|---|---|---|
| Text | FlyoutItemLabelStyle | FlyoutItemLabel |
| Icon | FlyoutItemIconStyle | FlyoutItemIcon |
| Container | FlyoutItemLayoutStyle |
このため,FlyoutItemの文字色や背景色,Iconの色などを変更したい場合は,上記のサンプルコードのようにこれらの情報を使って指定すること.
テキストに対してスタイルを変更する場合は,以下のようにする.
<Setter TargetName="FlyoutItemLabel" Property="Label.FontSize" Value="16" />
<Setter TargetName="FlyoutItemLabel" Property="Label.TextColor" Value="Blue" />
<Setter TargetName="FlyoutItemLabel" Property="Label.HeightRequest" Value="44" />
ResourceDictionaryを別ファイルに定義して読み込む
↓でも行っているように,GlobalStyles.xamlというファイルにResourceDictionaryを定義しておいて,それをApp.xamlのResourceDictionaryでSourceプロパティで読み込んでいる.
    <Application.Resources>
        <ResourceDictionary Source="common/GlobalStyles.xaml">
...```
Xamarin.Formsでソフトキーボードが表示されたときに他の表示要素が隠れてしまうのをなんとかしたい
参考
https://xamgirl.com/adjusting-elements-when-keyboard-shows-in-xamarin-forms
ソフトキーボード表示時のデフォルトの動作
Entryにフォーカスが移動すると,ソフトウェアキーボードが表示されます.

このとき,選択されたEntryが隠れないようにソフトウェアキーボードが表示されます.
これがデフォルトです.
解決したいこと
しかし,考慮されているのは「入力対象のEntryが隠れないこと」であって,その他の表示要素はソフトキーボードに隠れたり,または,スクロールによって画面外に出てしまったりします.
例えば,以下のように画面の先頭と一番下にEntryを配置して,真ん中にはListViewを配置します.

先頭のEntryを選択したときは,ソフトキーボードがListViewや下のEntryの上にかぶさるように表示されます.

次に一番下のEntryを選択した場合は,下からスライドアップしてくるソフトキーボードに合わせてView全体が上へスライドします.

先頭のEntryはまだしも,ListViewの一部も画面外に出てしまうため,入力中はListViewの画面外の情報を見ることはできず不便です.
解決
これを解決するためには各プラットフォームのプロジェクトに少しばかりの変更をくわえる必要があります.
その方法が冒頭のリンク先で紹介されています.
Android
Androidだけであれば非常に簡単です.
App.xamlを開き,Application要素に以下の2つを追加します.
    xmlns:android="clr-namespace:Xamarin.Forms.PlatformConfiguration.AndroidSpecific;assembly=Xamarin.Forms.Core"
    android:Application.WindowSoftInputModeAdjust="Resize"
追加後はこうなります.
<?xml version="1.0" encoding="utf-8" ?>
<Application
    x:Class="XFAdjustElemWhenKeyboardShows.App"
    xmlns="http://xamarin.com/schemas/2014/forms"
    xmlns:x="http://schemas.microsoft.com/winfx/2009/xaml"
    xmlns:android="clr-namespace:Xamarin.Forms.PlatformConfiguration.AndroidSpecific;assembly=Xamarin.Forms.Core"
    android:Application.WindowSoftInputModeAdjust="Resize"
    xmlns:d="http://xamarin.com/schemas/2014/forms/design"
    xmlns:mc="http://schemas.openxmlformats.org/markup-compatibility/2006"
    mc:Ignorable="d">
    <Application.Resources>

    </Application.Resources>
</Application>
これだけで以下のように表示要素がソフトキーボードによって隠れたり画面外に出ることがなくなります.

この例では真ん中に位置するListViewの領域が短く調整され,その縮まった領域の中でスクロールします.
このため,入力中であってもListViewのすべてのアイテムを見ることができます.
iOS
自分は iOSを持っていないので確認できないのですが,カスタムレンダラーで対応します.
参照したブログ記事のとおりにすればできると思います.自分でも確認したいですが.